RPi based 3D Scanner
Jump to navigation
Jump to search
The following scanner is based upon the FreeLss software and CiClops device design.
Website FREELSS
Website CiClop 3D Scanner
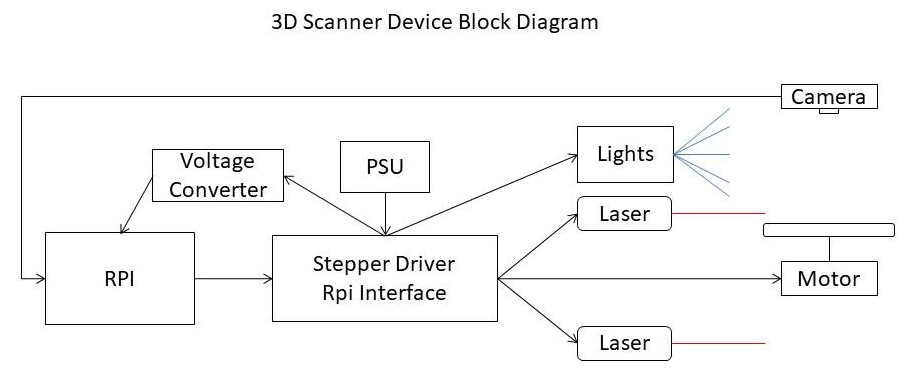
Basic Block Diagram
Structure
The scanning device is made from OpenBeam aluminum extrusion beams. The joining of the beams is via custom 3D printed parts and plates.
Updated 07-02-2019
Previous Configuration with Part Information
OpenBeam (violet)
- 30 cm length qty. 3
- 18 cm length qty. 2
- 12 cm length qty. 2
- 8 cm length qty. 6
3D Printed Joining Plates (red)
- Tee Joining Plate qty. 6
- El Joining Plates qty. 4
- Blank Plate 7.5x4.5 cm qty. 1
- Feet qty. 6
Note: Additional Blank Plates were added to reinforce frame from flexing.
3D Printed Mounting Plates
- Stepper Motor Plate qty. 1 (aqua)
- PCB Plate 8x12cm qty. 1 (green)
- Power Converter Plate qty. 1 (green)
- RPi Case Plate qty. 1 (orange)
- Camera Rear Plate qty. 1 (purple)
- Camera Front Plate qty. 1 (white)
- Laser Bracket Plate qty. 4 (blue and light blue)
- Rotating Platform Saddle qty. 1 (yellow)
- Platform Bearing Top Ring qty. 1 (yellow)
Additional Items
- LED Strip Shade qty. 1 (grey, 07-02-2019 update)
Rotating Platform Details
Assembled
Exploded
Laser Holder Assembly (Updated 07-02-2019)
Components
- Blue bracket is attached to the assembly cross bar.
- Pink bracket affixes laser to assembly.
- Lavender cylinder clamp used to rotate laser.
- White cylinder is the laser module.
Usage
- The Blue and Pink bracket allow aim of vertical laser line from left to right.
- The Lavender cylinder clamp allow the vertical laser line to be adjusted perpendicular to rotating platform.
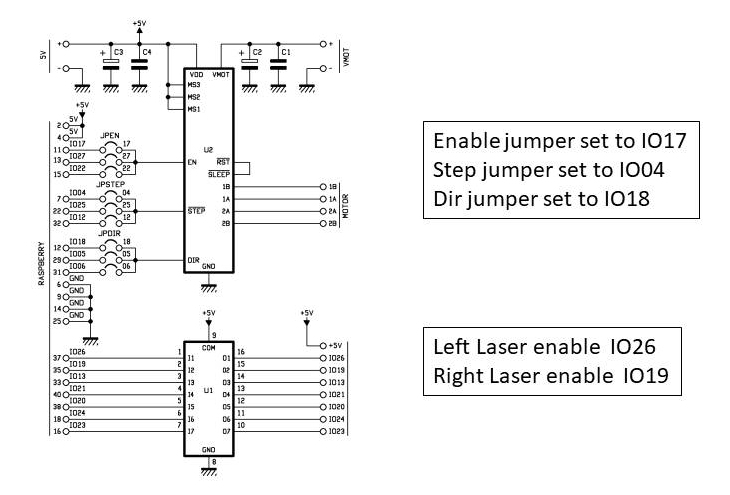
Schematic
Diagram
Pin Information
- To read the schematic and map to the FREELSS software, multiple pin definitions and labels are used.
- The far left column of pin numbers refers to the physical pin number on the Raspberry Pi header.
- The IOxx format pin numbers/labels refer to the GPIO numbering.
- When identifying the pin numbers in the FREELSS software setup, the Wiring Pi numbering is used.
Parts List
- Raspberry Pi 3 B+
- Raspberry 5.1 meg Camera
- Raspberry Pi Camera Cable
- Raspberry Pi GPIO Ribbon Cable
- Raspberry Pi Case
- Voltage Converter 12V to 5V 5A
- Laser Line Casting Module qty. 2
- RPi Proto Breadboard PCB
- DRV8825 Stepper Driver Module
- ULN2003 IC
- 100uf 35v Capacitor qty. 2
- Header Pins 2x11
- 2 Position Header Jumper qty. 3
- LED Strip 12V
- SPST Switch
- NEMA 17 Stepper Motor
- Mounting Hub (5mm)
- 16014 Open Bearing 70x110x13 Ball Bearings
- Rotating Platform (15 cm)
- Power Supply Brick 12v 2.8A


