Prototype Laptop Left in Coffee Shop
FOUND
Recently an unknown developer left a prototype laptop at a local coffee shop. The laptop was acquired by LVL1 for a teardown analysis. What follows is a photographic record of the teardown. It is hoped that the multi-billion dollar corporation developing this prototype will present LVL1 with a finder's fee.
Initial Analysis
A sharp eyed member of the teardown team noticed the word "PLAYSKOOL" on the front. The blatant misspelling of "school" leads our researchers to believe that this is an imported prototype. The use of a Greek Pi symbol may indicate the beginnings of a high tech industry in the acropolis. The transparent back confirms the prototype nature of the device and reveals a graphis of a possible pineapple or bunch of grapes. This is obviously targeted to the "green" crowd.
From the front, the main front power switch and a SD Card slot are visible. A front panel folds down to reveal a monitor, keyboard and USB mouse port. Just above them, a camera lens. The left side provides a USB, HDMI, RJ-45 and power connectors. The right side has a headphone jack, an I/O socket and a power with volume panel, likely to be audio because of its proximity to the headphone jack.
Back Removal
With the back removed and the wires brushed aside, it is obvious that this laptop is powered by a Raspberry Pi.
The Pi is a model B.
While unplugging the many wires to the Raspberry Pi, a number of wiring cables were also removed.
A 5 volt power harness for supplying power to the Raspberry Pi, USB Hub and audio amplifier module.
Ethernet cable connecting the Raspberry Pi to the case RJ-45 connector.
USB Cable for connecting Raspberry Pi USB port to USB hub master.
A headphone bypass assembly connected the Raspberry Pi analog audio output to the audio amplifier input with unamplified bypass to case headphone jack.
A cable from the built in monitor had several connections. One was for the composite video port on the Raspberry Pi which required a gender-changer and a separate power cable connected to the cases 12 volt power supply.
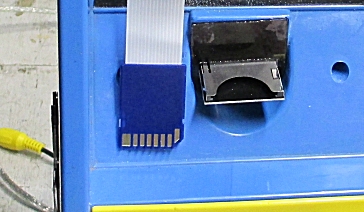
Connected to the Raspberry Pi's SD Card slot is an extender cable which allows the SD Card to be inserted from the front of the case.
And finally, a ribbon cable connecting the Raspberry Pi to a camera.
More Up Top
Along with wiring in the bottom of the case, the top of the case held a powered USB hub.
Among the USB hub connections is Wi-Pi US B WiFi dongle. Also connected are two pass-thru cables to the case's USB ports. One cable goes to the left side of the case while the other goes to the USB port near the keyboard behind the flap intended for a mouse. The built in keyboard is also connected to the hub.
The USB hub mounting plate comes out of the case.
But Wait There Is More
Beneath the USB hub plate is a second clear plate. This plate has the power screw terminal strip for the device.
When that plate is removed, the power switch, camera board and SD card extender connections are visible along with two speakers.
These speakers are wired to the audio amplifier output.
Gutted
With most of the insides removed, a few final elements are visible.
Built in monitor is mounted behind the front flap. Above it the front exterior power switch and SD card extender are visible.
Case power port is visible.
Audio Amplifier is seen here.
Back Together Again
As a test of robustness, the laptop was reassembled.
It should be noted that our reassemble created a neater wire jungle in the back then we found it.


