DS1820 Temp sensor
Introduction
DS1820 digital temp sensor In this experiment we will connect the DS1820 temperature sensor to the arduino, read the temperature and display it on the LCD.
This is a complex little chip. Please check out the resources at the bottom of this page for lots of information!
Components Needed
- Freeduino or Arduino or clone
- USB cable for Freeduino
- Freeduino development software - download here!
- Solderless Breadboard
- Hookup wire 22gauge solid
- DS1820 digital sensor
- 4.7K resistor (Yellow Violet Red)
- LCD Display
How to
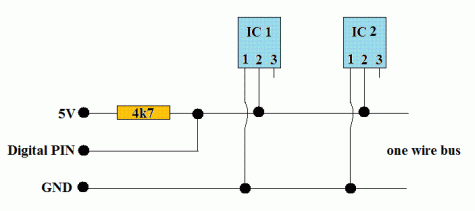
- Use the breadboard and hook up the circuit as seen below. You have to use the 4.7K resistor. The device is set up in parasitic power mode. Hook the digital pin to any of the digital pins that are open. I used digital pin 3 in the code below and it works with the LCD you set up previously.
- Download and install the library TCL 3.6.0 from http://milesburton.com/wiki/index.php?title=Dallas_Temperature_Control_Library#Code.2FLibrary. This zip file contains both the OneWire library and the DallasTemperature libraries.
- Copy the folders in the zip file to the 'libraries' folder in your arduino install or into the mydocuments/arduino/libraries folder. You might have to make that folder. You will know if your libraries are correctly installed if you see them listed under Sketch->Import Library in the Arduino IDE
- This library does the heavy lifting so you do not have to! This is why we create libraries!
Schematic
Code
First begin by running the program sample.pde in the folder where the OneWire library is (under example). You should see some messages when you turn on the serial monitor. Make sure you set the correct pin for the sensor at the top of the program.
Next run the simple.pde program in the DallasTemperature library. You should start seeing actual temperature readings!
Finally run the program below. It displays the temp on the LCD!
#include <OneWire.h>
#include <DallasTemperature.h>
#include <LiquidCrystal.h>


// Data wire is plugged into port 2 on the Arduino
#define ONE_WIRE_BUS 3

// initialize the library with the numbers of the interface pins
LiquidCrystal lcd(7, 8, 9, 10, 11, 12);

// Setup a oneWire instance to communicate with any OneWire devices (not just Maxim/Dallas temperature ICs)
OneWire oneWire(ONE_WIRE_BUS);

// Pass our oneWire reference to Dallas Temperature.
DallasTemperature sensors(&oneWire);

void setup(void)
{
  // set up the LCD's number of rows and columns:
  lcd.begin(16, 2);
  // Print a message to the LCD.
  lcd.print("LVL1 Temp DS1820");

  // Start up the library
  sensors.begin();
}

void loop(void)
{
  // call sensors.requestTemperatures() to issue a global temperature
  // request to all devices on the bus
  sensors.requestTemperatures(); // Send the command to get temperatures
    // set the cursor to column 0, line 1
  // (note: line 1 is the second row, since counting begins with 0):
  lcd.setCursor(0, 1);


  lcd.print(sensors.getTempFByIndex(0));
  lcd.print((char)223);
  lcd.print("F  ");

  lcd.print(sensors.getTempCByIndex(0));
  lcd.print((char)223);
  lcd.print("C");

  delay(500);
}
Troubleshooting
Are power and ground set up correctly?
Double check the schematic.
Resources
http://www.arduino.cc/playground/Learning/OneWire
http://www.arduino.cc/cgi-bin/yabb2/YaBB.pl?num=1199313338
http://www.phanderson.com/arduino/ds18b20_1.html
http://www.arunet.co.uk/tkboyd/e1didx.htm
http://milesburton.com/wiki/index.php?title=Dallas_Temperature_Control_Library
