Cylon LEDs
Jump to navigation
Jump to search
Introduction
Cylon LEDs In this experiment, we will create a Cylon (Battlestar Galactica) effect with LEDs. I get this request quite a lot when people are first starting to program arduinos.
Components Needed
- Freeduino or Arduino or clone
- USB cable for Freeduino
- Freeduino development software - download here!
- Solderless Breadboard
- Hookup wire 22gauge solid
- 8 LEDs -same color is preferable
- 8 1K resistors
How to
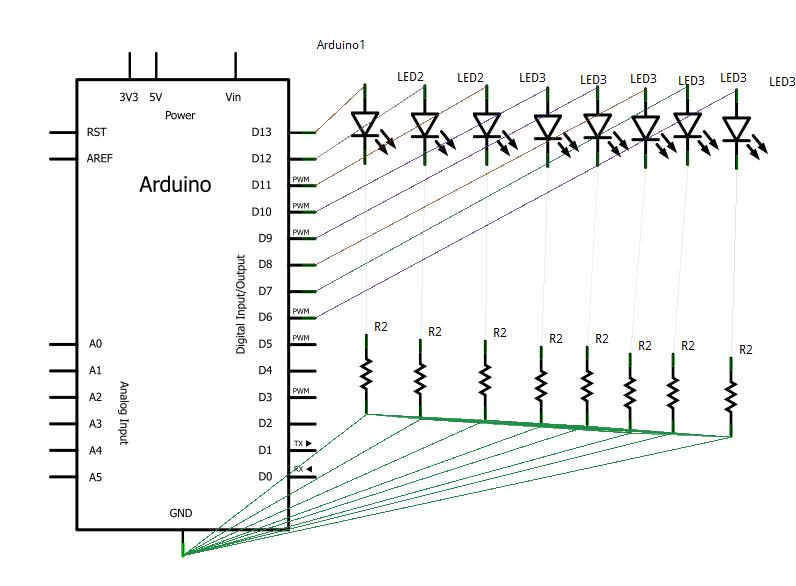
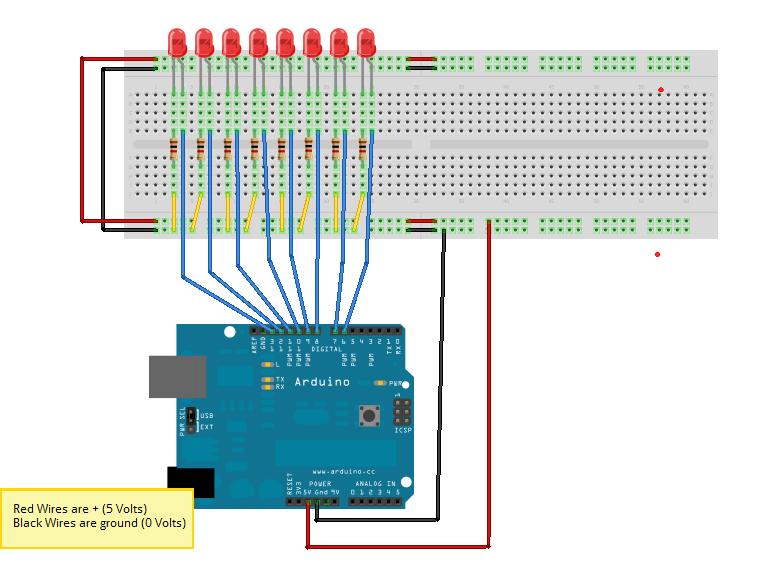
- See the fritzing diagram
Schematic
Fritzing
Code
//code for cylon
//bpw 2/11/22

int pinled1 = 13;
int pinled2 = 12;
int pinled3 = 11;
int pinled4 = 10;
int pinled5 = 9;
int pinled6 = 8;
int pinled7 = 7;
int t = 50;
void setup()
{
pinMode(pinled1, OUTPUT);
pinMode(pinled2, OUTPUT);
pinMode(pinled3, OUTPUT);
pinMode(pinled4, OUTPUT);
pinMode(pinled5, OUTPUT);
pinMode(pinled6, OUTPUT);
pinMode(pinled7, OUTPUT);
}

void loop()
{

digitalWrite(pinled1, HIGH);
delay(t);
digitalWrite(pinled2, HIGH);
delay(t);
digitalWrite(pinled1, LOW);
delay(t);
digitalWrite(pinled3, HIGH);
delay(t);
digitalWrite(pinled2, LOW);
delay(t);
digitalWrite(pinled4, HIGH);
delay(t);
digitalWrite(pinled3, LOW);
delay(t);
digitalWrite(pinled5, HIGH);
delay(t);
digitalWrite(pinled4, LOW);
delay(t);
digitalWrite(pinled6, HIGH);
delay(t);
digitalWrite(pinled5, LOW);
delay(t);
digitalWrite(pinled5, HIGH);
delay(t);
digitalWrite(pinled6, LOW);
delay(t);
digitalWrite(pinled4, HIGH);
delay(t);
digitalWrite(pinled5, LOW);
delay(t);
digitalWrite(pinled3, HIGH);
delay(t);
digitalWrite(pinled4, LOW);
delay(tim);
digitalWrite(pinled2, HIGH);
delay(t);
digitalWrite(pinled3, LOW);
delay(t);
digitalWrite(pinled1, HIGH);
delay(t);
digitalWrite(pinled2, LOW);
delay(t);
}
Troubleshooting
Probably the easiest way to troubleshoot LEDs is to power them. Take the wire that goes to the arduino output pin and touch it to 5V to see that the LED lights up. If it does not, turn the LED around and try again. LEDs are pretty hearty as long as you have a 1K resistor in series with them.

