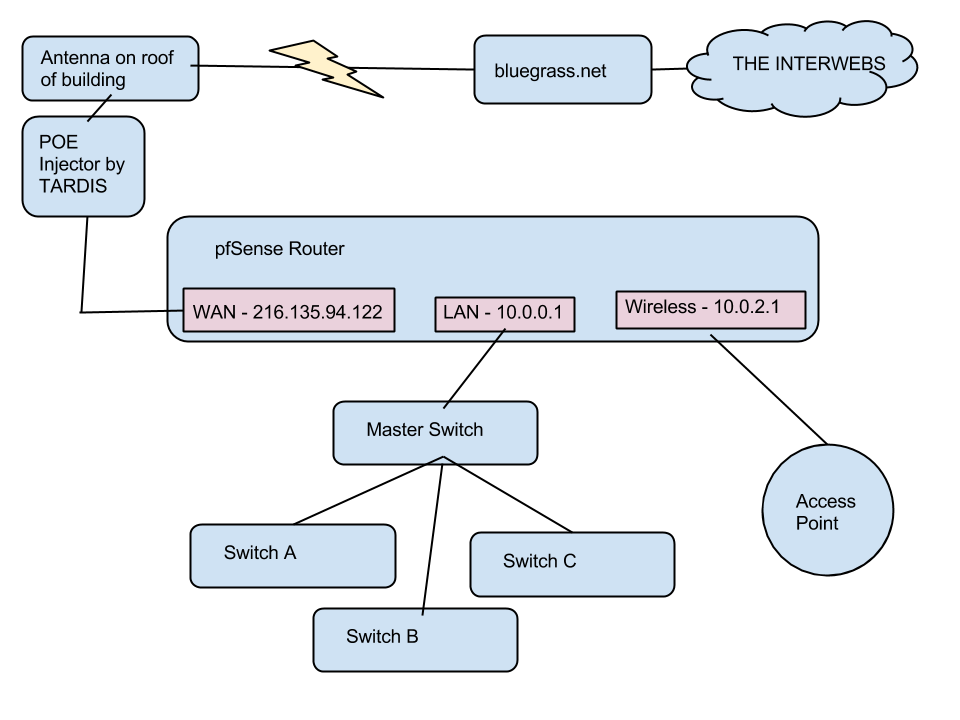
Network
Revision as of 12:56, 5 July 2015 by Notyou007a (talk | contribs)

|
| Network |
Internet Service graciously provided by http://bluegrass.net
Contents
Misc
- We have standards now! Please do not add hodgepodge stuff to our network infrastructure. Please see parts list below.
- There are two subnets, 10.0.0.0/23 for wired clients and 10.0.2.0/23 for wireless. The DHCP pool takes exactly 10.0.1.0/24 for wired and 10.0.3.0/24 for wireless
- What this means in laymans terms:
- Any IP that starts with 10.0.0 is a static wired client
- Any IP that starts with 10.0.1 is a dynamic wired cilent
- Any IP that starts with 10.0.2 is a static wireless client
- Any IP that starts with 10.0.3 is a dynamic wireless client
- The wireless access point comes directly off the pfSense box and does not pass through the switches in the rack. This just eliminates a few points of failure.
Internet IPs
- 216.135.94.120/29 (LVL1 IPs)
- 216.135.94.121 (bluegrass.net gateway)
- 216.135.64.2 (bluegrass.net DNS 1)
- 216.135.64.3 (bluegrass.net DNS 2)
Parts
- 2 Port Surface Mount Box
- Patch Panel for rack
- RJ-45 Jack (used in boxes and patch panel)
- Cable
- Patch Cable
Router Details
- Our router is a small pfSense box on the shelf in the network rack.
- It has five interfaces. We only use:
- WAN - connects to POE injector by TARDIS
- LAN - connects to Master switch
- WIRELESS - connects to wireless access point
- (These are labeled on the back on of the router in permanent marker.)
- DHCP runs here.
Switch Details
- Everything is layer 2, the switches have an IP address only for management purposes.
- Everything stays on default vlan.
- Master is a 24 port gig switch. All other switches have 24 100MB/s ports and two gig ports.
- For each access switch (A, B, C) the gig ports are trunked to provide redundancy and increase bandwidth.
conf t
trunk 25 trk1 trunk
trunk 26 trk1 trunk
- On the master switch three different trunks are created (trk1-trk3) to support the three access switches.
- If none of that made any sense, please just remember this: The links between switches have special configurations. Please do not move those cables around.
- Spanning tree is enabled (with portfast) and bpdu guard. If you create a loop the ports will get disabled. Telnet into the appropriate switch to re-enable it. All ports are labeled.
- For example: A7 = port 7 on switch A. If it is disabled:
telnet switch-a.lvl1.lan
conf t
int 7
enable
I need a static IP
- Instead of setting a static IP on your device, create a static lease in our router.
Why?
- Your device can still use DHCP but will get the same IP every time
- In some cases this can be much easier than manually setting a static IP
- If you take your device somewhere else it can still use DHCP
- You get a DNS entry
- Visibility. We can track things better if they're in our router. Manually setting IPs makes conflicts more likely.
How?
- Log into pfSense as admin at https://10.0.0.1/
- I'm not listing the creds on the wiki, any lvl1 member should be able to figure out the login
- On the top bar click Status, then DHCP Leases
- Scroll to the bottom of the page to pick your new IP
- For wired, you'll pick an IP that starts with 10.0.0 (within 10.0.0.0/24)
- For wireless, pick an IP that starts with 10.0.2 (within 10.0.2.0/24)
- The IPs listed are already taken. Pick something else and remember it or write it down for the next steps.
- For good measure, do a quick ping test to make sure nothing else has taken that.
- Scroll back up to the top of the page and find your device. You can use the MAC address, hostname (not reliable if we have multiple things called "raspberrypi") or your current IP. Newer leases are closer to the top.
- Click the + on the right next to your device.
- Enter the following
- IP Address: the ip address you picked earlier
- Hostname: what you want the hostname to be. This will also update DNS. Please be specific, bonus points for also using your name.
- Being a good member: aaronv-pi
- Being a bad member: raspberrypi
- Everything else can be ignored
- Click Save
- Click Apply
- Renew your DHCP lease or, if you're lazy, reboot

