Freeduino Games: Difference between revisions
m Added some software links |
Notyou007a (talk | contribs) No edit summary |
||
| Line 448: | Line 448: | ||
==Advanced== | ==Advanced== | ||
You are also allowed to use the Serial Monitor in combination with Processing or the like, to do stuff on your computer's display. The Freeduino should be the game engine. | You are also allowed to use the Serial Monitor in combination with Processing or the like, to do stuff on your computer's display. The Freeduino should be the game engine. | ||
[[Category:HOWTO]] | |||
Latest revision as of 00:02, 26 June 2015
Software to get
(WILL NEED) Arduino--to write & install software on your Freeduino [1]
(Optional) Processing--write PC, Mac, Linux/Android applications that work alone or with your Arduino [2]
(Optional) Eagle PCB Layout--create circuit boards [ftp://ftp.cadsoft.de/eagle/program/6.4/eagle-win-6.4.0.exe ]
You might also like SolidWorks (free for Speed students) or Sketchup (Free) for 3D prints
Freeduino Truck Lane
Go from the Freeduino Spring Training LCD activity to a game!
Need a Freeduino, a 10K pot, and a 16x2 LCD and a solderless breadboard. Follow all steps in 4th Inning. Now, pull the middle pot pin out of the LCD. Just connect that LCD pin to ground. (It's the third pin from the end of the LCD) This should give you a high contrast display. We need to use the pot for steering! Connect the middle pot pin instead to Analog Input pin 1 of your Freeduino. We didn't add a speaker, just used pin 13 to light up the onboard green LED if you "crash" in the game. If you want to use a speaker, connect it to a PWM pin like digital 3, 5 or 6 and adjust the code accordingly.
Here's the code, cut and paste this into Arduino and install it to your board. Play away. To play again, press the Freeduino's reset button.
Much more including videos at the game's original site [3]. We've changed the pinouts in the code to match what we did in the Freeduino Spring Training LCD activity.
Can you modify the code to make a game that rewards crashing? For example, scoot around catching falling "coins," and see how many you can collect within a certain time. Then, make them fall faster and faster! This would be a fun way to learn more about what the code is doing.
/* Simple Car game for a 16x2 LCD display
   You can use any Hitachi HD44780 compatible LCD.
   Modified for LVL1 Spring Training LCD Activity,
    Originally from
    @TheRealDod, Nov 25, 2010
   There's a "steering wheel" potentiometer on analog input 1,
   and a led on pin 13

   Enjoy,

*/
#include <LiquidCrystal.h>
// LiquidCrystal display
// You can use any Hitachi HD44780 compatible. Wiring explained at
// http://www.arduino.cc/en/Tutorial/LiquidCrystal
LiquidCrystal lcd(7, 8, 9, 10, 11, 12);

// Steering wheel potentiometer
const int POTPIN = 1;
const int MAXPOT = 800; // no need to turn the wheel all the way to 1023 :)

// Piezo speaker
const int SPEAKERPIN = 13;//you can see the led flash when u crash

const int RANDSEEDPIN = 0; // an analog pin that isn't connected to anything

const int MAXSTEPDURATION = 300; // Start slowly, each step is 1 millisec shorter.
const int MINSTEPDURATION = 150; // This is as fast as it gets

const int NGLYPHS = 6;
// the glyphs will be defined starting from 1 (not 0),
// to enable lcd.print() of null-terminated strings
byte glyphs[NGLYPHS][8] = {
  // 1: car up
  { B00000,
    B01110,
    B11111,
    B01010,
    B00000,
    B00000,
    B00000,
    B00000}
  // 2: car down
  ,{B00000,
    B00000,
    B00000,
    B00000,
    B01110,
    B11111,
    B01010,
    B00000}
  // 3: truck up
  ,{B00000,
    B11110,
    B11111,
    B01010,
    B00000,
    B00000,
    B00000,
    B00000}
  // 4: truck down
  ,{B00000,
    B00000,
    B00000,
    B00000,
    B11110,
    B11111,
    B01010,
    B00000}
  // 5: crash up
  ,{B10101,
    B01110,
    B01110,
    B10101,
    B00000,
    B00000,
    B00000,
    B00000}
  // 6: crash down
  ,{B00000,
    B00000,
    B00000,
    B10101,
    B01110,
    B01110,
    B10101,
    B00000}
};

const int NCARPOSITIONS = 4;

// Each position is mapped to a column of 2 glyphs
// Used to make sense when I had a 5th position
// where car or crash was drawn as 2 glyphs
// (can't do that since 0 terminates strings),
// so it's kinda silly now, but it ain't broke :)
const char BLANK=32;
char car2glyphs[NCARPOSITIONS][2] = {
  {1,BLANK},{2,BLANK},{BLANK,1},{BLANK,2}
};
char truck2glyphs[NCARPOSITIONS][2] = {
  {3,BLANK},{4,BLANK},{BLANK,3},{BLANK,4}
};
char crash2glyphs[NCARPOSITIONS][2] = {
  {5,BLANK},{6,BLANK},{BLANK,5},{BLANK,6}
};

const int ROADLEN = 15; // LCD width (not counting our car)
int road[ROADLEN]; // positions of other cars
char line_buff[2+ROADLEN]; // aux string for drawRoad()
int road_index;
int car_pos;
// Off-the-grid position means empty column, so MAXROADPOS
// determines the probability of a car in a column
// e.g. 3*NCARPOSITIONS gives p=1/3
const int MAXROADPOS = 3*NCARPOSITIONS;
int step_duration;

int crash; // true if crashed
unsigned int crashtime; // millis() when crashed
const int CRASHSOUNDDURATION = 250;

const char *INTRO1="Trucks ahead,";
const char *INTRO2="Drive carefully";
const int INTRODELAY = 2000;

void setup()
{
  crash = crashtime = road_index = 0;
  step_duration = MAXSTEPDURATION;
  line_buff[1+ROADLEN] = '\0'; // null terminate it
  randomSeed(analogRead(RANDSEEDPIN));
  for (int i=0; i<NGLYPHS; i++) {
    lcd.createChar(i+1,glyphs[i]);
  }
  for (int i=0; i<ROADLEN; i++) {
    road[i]=-1;
  }
  pinMode(SPEAKERPIN,OUTPUT);
  analogWrite(SPEAKERPIN,0); // to be on the safe side
  lcd.begin(16,2);
  getSteeringWheel();
  drawRoad();
  lcd.setCursor(1,0);
  lcd.print(INTRO1);
  lcd.setCursor(1,1);
  lcd.print(INTRO2);
  delay(INTRODELAY);
}

void loop() {
  unsigned long now = millis()-INTRODELAY;
  if (!crash) {
    getSteeringWheel();
    crash = (car_pos==road[road_index]);
  }
  if (crash) {
    if (!crashtime) {
      crashtime=now;
      drawRoad();
      // Game over text
      // (keep first 2 "crash" columns intact)
      lcd.setCursor(2,0);
      lcd.print("Crashed after");
      lcd.setCursor(2,1);
      lcd.print(now/1000);
      lcd.print(" seconds.");
    }
    if ((now-crashtime)<CRASHSOUNDDURATION) {
      analogWrite(SPEAKERPIN,random(255)); // white noise
    }
    else {
      analogWrite(SPEAKERPIN,0); // dramatic post-crush silence :)
    }
    delay(10); // Wait a bit between writes
  }
  else {

    int prev_pos = road[(road_index-1)%ROADLEN];
    int this_pos = random(MAXROADPOS);
    while (abs(this_pos-prev_pos)<2) { // don't jam the road
      this_pos = random(MAXROADPOS);
    }
    road[road_index] = this_pos;
    road_index = (road_index+1)%ROADLEN;
    drawRoad();
    delay(step_duration);
    if (step_duration>MINSTEPDURATION) {
      step_duration--; // go faster
    }
  }
}
void getSteeringWheel() {
  car_pos = map(analogRead(POTPIN),0,1024,0,NCARPOSITIONS);
}

void drawRoad() {
  for (int i=0; i<2; i++) {
    if (crash) {
      line_buff[0]=crash2glyphs[car_pos][i];
    }
    else {
      line_buff[0]=car2glyphs[car_pos][i];
    }
    for (int j=0; j<ROADLEN; j++) {
      int pos = road[(j+road_index)%ROADLEN];
      line_buff[j+1] = pos>=0 && pos<NCARPOSITIONS ? truck2glyphs[pos][i] : BLANK;
    }
    lcd.setCursor(0,i);
    lcd.print(line_buff);
  }
}
Freeduino Whack-A-Mole
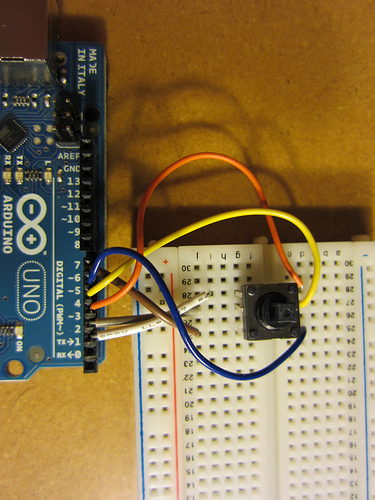
And next, Freeduino Whack-A-Mole![4] We need 5-way joysticks for this one. It will introduce the Arduino Serial Monitor. We're getting this 5-way joystick (5 way= up,down,left,right and button press)- it's a navigation switch from Adafruit.[5]
Here's the datasheet for the 5-way switch" [6]
Here's the code:
/*
This is a whackamole game.
 Joystick connected as follows: (Instructions are for Adafruit 5-way switch part 504)
 Up    Arduino digital pin 3, to switch pin 5
 Right		 Arduino digital pin 4, to switch pin 3
 Down		  Arduino digital pin 5, to switch pin 2
 Left		  Arduino digital pin 6, to switch pin 1
 Button		Arduino digital pin 7, to switch pin 6

 If you follow this map it should work--you might have to rotate your breadboard
 Make sure the switch is well connected to the breadboard.

 Common: Digital Pin 2 to switch pin 4

 Press the button to start
 */


const char cross = '*';
const char mole = 'O';
const char both = '@';
const char miss = 'x';
const char hit = '#';
const char blank = '.';

int crossCoor;
int moleCoor;
long spawn;
int limit;
char pic;
boolean dead;
int coor;


void setup()  {
  for(int i=3; i<=7; i++) {
    pinMode(i, INPUT);
    digitalWrite(i, HIGH);
  }
  pinMode(2, OUTPUT);
  digitalWrite(2, LOW);
  Serial.begin(115200);
  coor=5;//start out in the middle
}


int crossGet()  {//fixed so it works a little better w 5 way switch now

  int mycoor = coor;
  if(digitalRead(3) == HIGH)  {//up
    mycoor += 3;
  }
  if(digitalRead(5) == HIGH)  {//down
    mycoor -= 3;
  }
  if(digitalRead(4) == HIGH)  {//right
    mycoor --;
  }
  if(digitalRead(6) == HIGH)  {//left
    mycoor ++;
  }
  if((mycoor>0)&(mycoor<10)){
     coor=mycoor;
  }
   return coor;
}


boolean pressed()  {
  boolean res;
  if(digitalRead(7)==LOW)  {
    res=true;
  }
  else  {
    res=false;
  }
  return res;
}

void display(int molePos)  {
  int one=crossGet();
  boolean button = pressed();
  for(int i=1; i<=9; i++)  {

    if(one==i && molePos==i)  {
      if(button)  {
        pic = hit;
        dead=true;
      }
      else  {
        pic=both;
      }
    }
    else if(one == i)  {
      if(button)  {
        pic=miss;
      }
      else  {
        pic=cross;
      }
    }
    else if(molePos==i)  {
      pic=mole;
    }
    else  {
      pic=blank;
    }
    if(i==3 || i==6 || i==9)  {
      Serial.println(pic);
    }
    else  {
      Serial.print(pic);
    }
  }
}

void makeMole()  {
  spawn = millis();
  randomSeed(analogRead(0));
  moleCoor = random(1, 10);
  dead=false;
}

void noMole()  {
  moleCoor=10;
}

void loop()  {
  Serial.println("Ready to play?");
  while(digitalRead(7)==HIGH)  {
  }
  Serial.println("Ready...");
  delay(1000);
  Serial.println("Set...");
  delay(1000);
  Serial.println("GO!");

  boolean lost = false;
  int score = 0;
  limit= 5000;

  while(lost==false ) {
    int time = random(100, 300);
    for(int i=0; i<=time; i++)  {
      display(10);
      Serial.println();
      delay(50);
    }
    makeMole();
    while(dead==false && spawn+limit >= millis())  {
      display(moleCoor);
      if(pic=='#')  {
        dead = true;
      }
      Serial.println();
      delay(50);
    }
    if(dead)  {

      score++;
      if(limit>1000)  {
        limit -= 50;
      }
      delay(100);

    }
    else  {
      break;
    }
  }
  Serial.println("You lost");
  delay(1000);
  Serial.print("Your score was  ");
  Serial.println(score);
  Serial.println();
  delay(1000);
  while(digitalRead(7)==HIGH)  {
  }
  delay(1000);
}
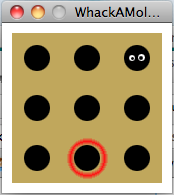
The code works okay with the Serial Monitor, except it scrolls away so it can be hard to track what's happening with the little whack-a-mole symbols. Instead--you could have a Processing program turn the symbols into pictures. Download & install Processing from processing.org (very similar to Arduino except is generally for making programs on your laptop), unzip these files [7] and put them in your Processing sketch folder, plug in your Arduino running the Whack-a-Mole code and finally launch the Processing Whack-a-Mole screen program. For Windows users, if it doesn't connect, you might have to adjust the portName string from Serial.list()[0] to Serial.list()[1] or another number that connects with your Arduino. Then you'll get this:

Others
What games can you make from a Freeduino, LCD, one pot, one 5-way joystick, some LEDs, a temperature sensor, a light sensor and maybe a piezo speaker?
Advanced
You are also allowed to use the Serial Monitor in combination with Processing or the like, to do stuff on your computer's display. The Freeduino should be the game engine.
