Inkscape Extension to Render a Living Hinge: Difference between revisions
No edit summary |
No edit summary |
||
| (3 intermediate revisions by the same user not shown) | |||
| Line 8: | Line 8: | ||
The pattern of cuts in these hinges are typical of those used to make a living hinge. | The pattern of cuts in these hinges are typical of those used to make a living hinge. | ||
== | == Installing the Extension == | ||
To install the extension in Inkscape two files are needed: | To install the extension in Inkscape two files are needed: | ||
| Line 15: | Line 15: | ||
living_hinge.py | living_hinge.py | ||
Both files need to be put in the Inkscape extensions directory. On Linux it is located somewhere like /usr/share/inkscape/extensions. On Windows you will find an inkscape/extensions directory in the program files directory. On Mac | Both are available from GitHub[https://github.com/drphonon/Inkscape_LivingHinge] in a zip file[https://github.com/drphonon/Inkscape_LivingHinge/archive/master.zip]. | ||
Both files need to be put in the Inkscape extensions directory. On Linux it is located somewhere like /usr/share/inkscape/extensions. On Windows you will find an inkscape/extensions directory in the program files directory. On Mac you're on your own. | |||
== Using the Extension == | |||
You select one or more rectangles in the SVG document. Each rectangle will be filled with cut lines for a living hinge. Each set of cut lines for a hinge are created as a single path. The rectangles must be selected before accessing the extension. It is accessed by the menu Extensions->Render->Living Hinge | |||
[[File:hinge_menu.png|400px]] | |||
The extension dialog has a few parameters to set. | |||
[[File:hinge_dialog.png|400px]] | |||
cut length (y): This is the length of each cut in the hinge. The cuts run in the y-direction. | |||
gap length (y): This is the distance in the y-direction between adjacent cuts. | |||
separation distance (x): This is the separation in the x-direction between successive lines of cuts. | |||
The cut length will be adjusted so that an integral number of cuts is made inside the rectangle in the y-direction. The separation distance will be adjusted so that an integer number of cuts is made inside the rectangle in the x-direction. | |||
Here is the result. | |||
[[File:hinge-cuts.png]] | |||
Latest revision as of 11:41, 8 December 2013
A living hinge is a way to make rigid materials like plywood and acrylic sheets flexible by making cuts in the material. The Living Hinge Inkscape extension is a project by Mark Endicott to automate the process of drawing the cut lines needed to form a living hinge. It is an extension to the popular SVG graphics program Inkscape.
Living Hinge Examples
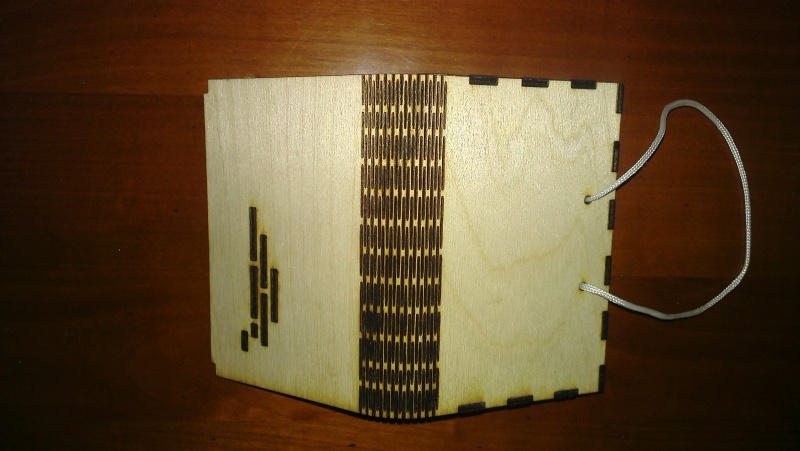
The pattern of cuts in these hinges are typical of those used to make a living hinge.
Installing the Extension
To install the extension in Inkscape two files are needed:
living_hinge.inx
living_hinge.py
Both are available from GitHub[1] in a zip file[2].
Both files need to be put in the Inkscape extensions directory. On Linux it is located somewhere like /usr/share/inkscape/extensions. On Windows you will find an inkscape/extensions directory in the program files directory. On Mac you're on your own.
Using the Extension
You select one or more rectangles in the SVG document. Each rectangle will be filled with cut lines for a living hinge. Each set of cut lines for a hinge are created as a single path. The rectangles must be selected before accessing the extension. It is accessed by the menu Extensions->Render->Living Hinge
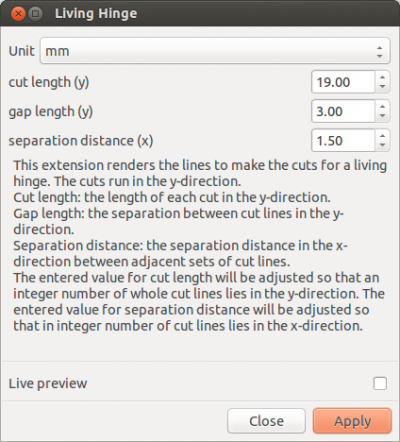
The extension dialog has a few parameters to set.
cut length (y): This is the length of each cut in the hinge. The cuts run in the y-direction.
gap length (y): This is the distance in the y-direction between adjacent cuts.
separation distance (x): This is the separation in the x-direction between successive lines of cuts.
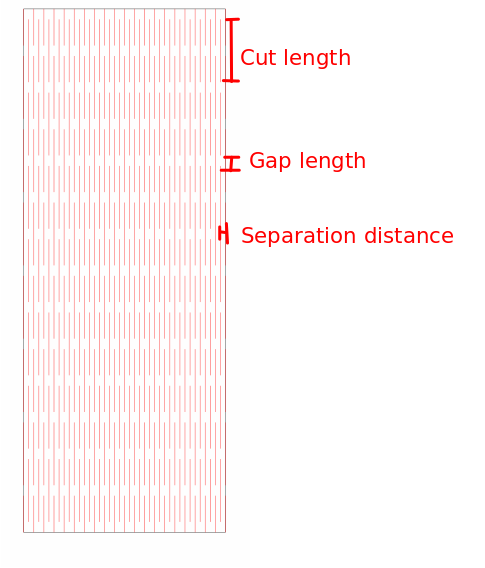
The cut length will be adjusted so that an integral number of cuts is made inside the rectangle in the y-direction. The separation distance will be adjusted so that an integer number of cuts is made inside the rectangle in the x-direction.
Here is the result.


