Rocket Engine Test Stand: Difference between revisions
No edit summary |
No edit summary |
||
| (3 intermediate revisions by the same user not shown) | |||
| Line 9: | Line 9: | ||
=== Structure === | === Structure === | ||
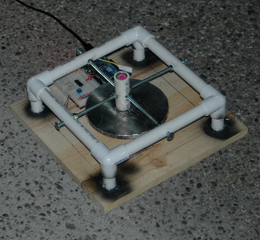
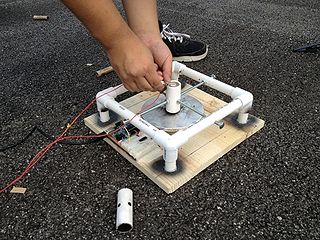
The test stand is built from a 12” x 12” x ½” pine board base. The structure is built using 9” x ½” diameter PVC pipe and connectors and connects to the base via hot glue. Each PVC pipe side has a ¼” hole drilled in the middle. This is for the four 5” x ¼-20 rods with nuts that securely center the rocket engine chamber. The rocket engine chamber varies by rocket engine. For A, B, and C motors, a ¾” diameter PVC pipe is used and cut to the length of the engine. For D and E motors, a 1” diameter PVC pipe is used. Each rocket engine chamber has four ¼” holes drilled at 90 degree angles for the centering rods to mate to. The holes are drilled just high enough so that the rocket engine chamber does not sit on the scale, but still almost fully covers the rocket engine (about 1/16” clearance). The mechanism used to sense thrust is a strain gauge from a Harbor Freight digital scale | The test stand is built from a 12” x 12” x ½” pine board base. The structure is built using 9” x ½” diameter PVC pipe and connectors and connects to the base via hot glue. Each PVC pipe side has a ¼” hole drilled in the middle. This is for the four 5” x ¼-20 rods with nuts that securely center the rocket engine chamber. The rocket engine chamber varies by rocket engine. For A, B, and C motors, a ¾” diameter PVC pipe is used and cut to the length of the engine. For D and E motors, a 1” diameter PVC pipe is used. Each rocket engine chamber has four ¼” holes drilled at 90 degree angles for the centering rods to mate to. The holes are drilled just high enough so that the rocket engine chamber does not sit on the scale, but still almost fully covers the rocket engine (about 1/16” clearance). The mechanism used to sense thrust is a strain gauge from a Harbor Freight digital scale. The strain gauge is centered on the base and screwed in. The strain gauge was outfitted with a plastic faceplate. This was covered with aluminum tape to protect the plate from the heat and impact of the deployment charges found in hobby rocket engines. Finally, an Arduino Uno and breadboard combo (custom made) is hot glued above the strain gauge. | ||
<center>[[File:rets2.png| | <center>[[File:rets2.png|x240px]] [[File:rets3.jpg|x240px]]</center> | ||
=== Electronic Hardware === | === Electronic Hardware === | ||
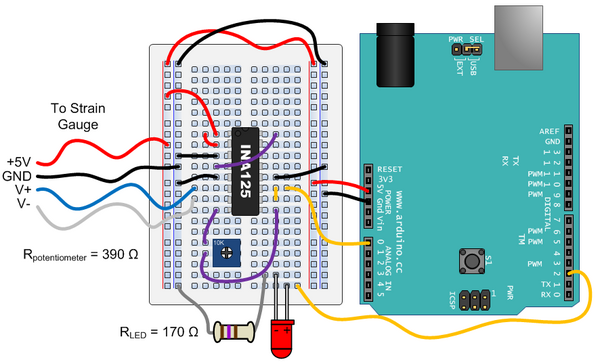
Good data cannot simply be taken by reading the voltage change across the strain gauge Wheatstone bridge. A signal amplifier is needed. The test stand strain gauge is interfaced with a Texas Instruments INA125 Instrumentation Amplifier | Good data cannot simply be taken by reading the voltage change across the strain gauge Wheatstone bridge. A signal amplifier is needed. The test stand strain gauge is interfaced with a Texas Instruments INA125 Instrumentation Amplifier. This provides a reliable and adjustable analog voltage signal representing the force the strain gauge is feeling. The INA125 requires a tuning resistor to control the gain of the strain gauge analog voltage. A potentiometer is used to adjust this on the fly. The potentiometer in use is set to 390 ohms. Finally, the INA125 voltage out pin is connected to an ADC pin on the Arduino Uno. | ||
In order to know when to ignite the rocket engine, a red LED is connected to a digital output pin. | In order to know when to ignite the rocket engine, a red LED is connected to a digital output pin. | ||
[[File:RETS_Wiring_diagram.png|center|600 px]] | |||
=== Software === | === Software === | ||
Latest revision as of 18:29, 15 July 2012

Introduction
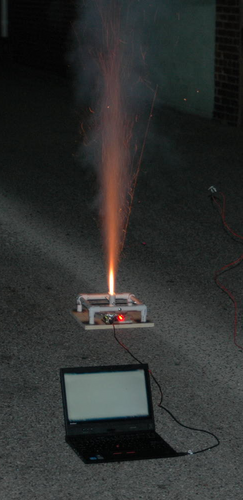
The mini rocket engine test stand is the first project to come out of LVL1 Hackerspace’s Rocketeers group. It is inspired by the Rocketeers group need to measure thrust for future custom rocket engines. The test stand is currently designed to launch typical hobby rocket engines downward onto a scale, primarily for safety concerns. The scale used can measure up to about 5000 grams of thrust generated by typical hobby rocket engines. The data is currently collected by an Arduino ADC channel connected to a strain gauge and support hardware. The data is interpreted by an Excel spreadsheet.
Design
Structure
The test stand is built from a 12” x 12” x ½” pine board base. The structure is built using 9” x ½” diameter PVC pipe and connectors and connects to the base via hot glue. Each PVC pipe side has a ¼” hole drilled in the middle. This is for the four 5” x ¼-20 rods with nuts that securely center the rocket engine chamber. The rocket engine chamber varies by rocket engine. For A, B, and C motors, a ¾” diameter PVC pipe is used and cut to the length of the engine. For D and E motors, a 1” diameter PVC pipe is used. Each rocket engine chamber has four ¼” holes drilled at 90 degree angles for the centering rods to mate to. The holes are drilled just high enough so that the rocket engine chamber does not sit on the scale, but still almost fully covers the rocket engine (about 1/16” clearance). The mechanism used to sense thrust is a strain gauge from a Harbor Freight digital scale. The strain gauge is centered on the base and screwed in. The strain gauge was outfitted with a plastic faceplate. This was covered with aluminum tape to protect the plate from the heat and impact of the deployment charges found in hobby rocket engines. Finally, an Arduino Uno and breadboard combo (custom made) is hot glued above the strain gauge.


Electronic Hardware
Good data cannot simply be taken by reading the voltage change across the strain gauge Wheatstone bridge. A signal amplifier is needed. The test stand strain gauge is interfaced with a Texas Instruments INA125 Instrumentation Amplifier. This provides a reliable and adjustable analog voltage signal representing the force the strain gauge is feeling. The INA125 requires a tuning resistor to control the gain of the strain gauge analog voltage. A potentiometer is used to adjust this on the fly. The potentiometer in use is set to 390 ohms. Finally, the INA125 voltage out pin is connected to an ADC pin on the Arduino Uno.
In order to know when to ignite the rocket engine, a red LED is connected to a digital output pin.

Software
The Arduino source code is very small and simple to understand. The following source listing with comments is self-explanatory.
 /*
 Written by: Nathan Armentrout, June 2012
 Written for: Arduino Uno

 Purpose:
 This program reads the analog voltage values presented by a Texas
 Instruments INA125 instrumentation amplifier connected to a strain
 gauge. A preprogrammed number of samples are taken and transmitted
 to the serial lines of the Arduino Uno.
 */

 // PIN defines
 #define  STRAIN_GUAGE  0      // Strain gauge is connected to analog pin 0
 #define  START_PIN     2      // LED is connected to digital pin 2
 #define  NUM_SAMPLES   2000   // The number of voltage input samples to take

 int val;  // This variable represents the analog voltage value,
           // Possible values: 0 to 1023 inclusive

 void setup()
 {
   // Arduino Configuration
   analogReference(DEFAULT);      // Setup Arduino to use default voltage reference of 5V
   Serial.begin(9600);            // Start up serial lines for 9600 baud
   pinMode(START_PIN,OUTPUT);     // Configure LED digital pin as an output

   // Countdown
   delay(10000);                  // Delay program for 10 seconds before starting data capture
   digitalWrite(START_PIN,HIGH);  // Turn on LED to signal human to ignite the rocket engine

   // Data Capture
   for (int i = 0; i < NUM_SAMPLES; i++) // Begin gathering NUM_SAMPLES number of samples
   {                                     // as fast as possible
     val = analogRead(STRAIN_GUAGE);     // Read the value of the analog input pin
     Serial.print(i);                    // Print to serial the sample number
     Serial.print(",");                  // Print to serial a number separator
     Serial.println(val);                // Print to serial the value of the analog voltage
   }
 }

 void loop()
 {
   // Do nothing
 }
As shown, the collected data is printed to the Arduino Serial lines. The data is copied to an Excel spreadsheet, which reformats the data text into numbers and plots.
Results
The following image shows a real rocket engine test. As previously stated, this data has no real useful meaning yet, but it does show a characteristic curve of a hobby rocket engine, which is promising.

Future Work
The test stand needs several immediate functional improvements. First, note that the test stand has not been calibrated, making the gathered data more or less useless. A weight set needs to be obtained and used to correlate analog voltage to force. A mathematical model needs to be developed to make further improvements to accuracy. Second, the Arduino ADC is slow and low resolution. A dedicated, fast, high resolution ADC IC needs to be added. Third, a zero feature needs to be added in software to help discount the weight of the rocket engine. However, more accurate thrust measurements can be obtained if a changing weight model is used instead. Fourth, the test stand needs to be outfitted with a remote launch mechanism that will synchronize rocket engine ignition with data collection. This will save the hassle of guessing how long to collect data and minimize the start time error. Moreover, this improvement will increase safety if this process can be started remotely using wireless modules (Zigbee?). Lastly, data collection over Arduino Serial is a terrible idea. An SD card should be added to store data in CSV style text files.
Long term goals for this project is to expand the test stand to accommodate larger rocket engines. This will require more sophisticated, redundant force cells and supporting instrumentation amplification hardware.
Notes
One hilarious, unintended feature about the test stand is that the rocket engine chamber automatically ejects spent rocket engines if and when the rocket engine’s parachute charge discharges. This is a little dangerous because the engine flies about four feet while still hot.
The test stand was demonstrated at the Louisville Science Center during the Youth Science Summit 2012.