Craftsman Belt and Disk Sander: Difference between revisions
Jump to navigation
Jump to search
No edit summary |
No edit summary |
||
| (12 intermediate revisions by the same user not shown) | |||
| Line 1: | Line 1: | ||
{{Template:Equipment | {{Template:Equipment | ||
|owner=on loan from member Jim Dallam | |owner=on loan from member Jim Dallam | ||
|serial= | |serial=0084.P0051 | ||
|model=Sears Craftsman 113.225831 (with legs and motor) | |model=Sears Craftsman 113.225831 (with legs and motor) | ||
|arrived=December 10, 2019 | |arrived=December 10, 2019 | ||
| Line 12: | Line 12: | ||
== Usage/Safety == | == Usage/Safety == | ||
General safety instructions for power tools (from this machine's manual)<br /> | |||
# Know your power tool (read and understand the owner's manual before using and understand the specific hazards)<br /> | |||
# Ground all tools (use grounded 3-prong plug inserted into proper grounding type receptacle)<br /> | |||
# Keep guards in place (and in working order with proper adjustment and alignment)<br /> | |||
# Remove adjusting keys and wrenches (form habit to check they are removed from tool before turning on the machine)<br /> | |||
# Keep work area clean (cluttered areas and benches invite accidents and floor may be slippery due to sawdust)<br /> | |||
# Avoid dangerous environment (don't use power tools in damp or wet locations, keep work area well lighted)<br /> | |||
# Keep children away (all visitors should be kept at a safe distance)<br /> | |||
# Make workshop kid-proof (consider padlocks, master switches and/or starter keys)<br /> | |||
# Don't force tool (it will do the job better and safer at the rate for which it was designed)<br /> | |||
# Use right tool (don't force the tool or attachment to do a job it was not designed for)<br /> | |||
# Wear proper apparel (don't wear loose clothing, gloves, neckties, or jewelry, contain long hair, roll-up sleeves above the elbow)<br /> | |||
# Use safety goggles (must comply with ANSI Z87.1, use face or dust mask and ear protection during extended periods of usage)<br /> | |||
# Secure work (use clamps or a vice to hold work when practical as it is safer than using your hand)<br /> | |||
# Don't overreach (keep proper footing and balance at all times)<br /> | |||
# Maintain tools with care (keep tools sharp and clean for best and safest performance)<br /> | |||
# Disconnect tools (before servicing when changing accessories, belts, and disks)<br /> | |||
# Avoid accidental starting (make sure switch in in "OFF" position before plugging in)<br /> | |||
# Use recommended accessories (consult the manual for recommended accessories, follow instructions, improper accessories may cause hazards)<br /> | |||
# Never stand on tool (serious injury could occur if the tool is tipped or if the cutting tool is accidentally contacted)<br /> | |||
# Check damaged parts (a damaged guard should be checked for proper function, check alignment of moving parts, binding, breakage, etc.)<br /> | |||
# Direction of feed (feed work into a blade or cutter against the direction of rotation of the blade or cutter only)<br /> | |||
# Never leave tool running unattended (turn power off and don't leave the tool until it comes to a complete stop)<br /> | |||
Watch this good generic introduction safety usage YouTube video (5:48 mm:ss) and/or find additional similar videos | Watch this good generic introduction safety usage YouTube video (5:48 mm:ss) and/or find additional similar videos | ||
https://www.youtube.com/watch?v=TZzZcNNOD28 | * https://www.youtube.com/watch?v=TZzZcNNOD28 | ||
== Specifications == | |||
Here is a link for the manual: | |||
* https://drive.google.com/file/d/1fvHhPb_pCqoaMDill7W7TMtyqouAOPiL/view?usp=sharing | |||
This equipment uses the following sandpaper belt/disk sizes: | This equipment uses the following sandpaper belt/disk sizes: | ||
| Line 45: | Line 49: | ||
Here is an Amazon link for 6"x48" sanding belts: | Here is an Amazon link for 6"x48" sanding belts: | ||
https://www.amazon.com/s?k=6+x+48+inch+sanding+belts&dc&crid=2CFQZWKZ91WUA&qid=1576632365&sprefix=6%22x48%22%2Caps%2C188&ref=sr_pg_1 | * https://www.amazon.com/s?k=6+x+48+inch+sanding+belts&dc&crid=2CFQZWKZ91WUA&qid=1576632365&sprefix=6%22x48%22%2Caps%2C188&ref=sr_pg_1 | ||
Here is an Amazon link for 9" dia. sanding disks: | Here is an Amazon link for 9" dia. sanding disks: | ||
https://www.amazon.com/s?k=9+inch+diameter+sandpaper+discs&ref=nb_sb_noss | *https://www.amazon.com/s?k=9+inch+diameter+sandpaper+discs&ref=nb_sb_noss | ||
The motor is 3/4 HP, 3450 RPM, 115 VAC, 60 Hz, single-phase, 10.0 amps | |||
== Configurations == | |||
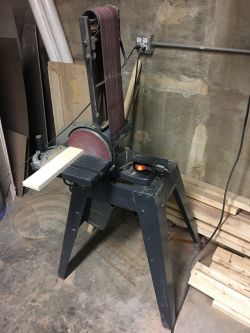
[[File:BeltDiskSander1of3.JPG|250px]] Table positioned for disk sanding | |||
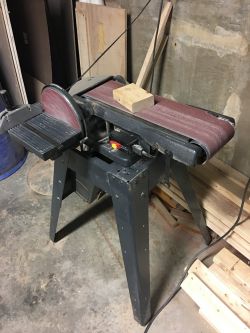
[[File:BeltDiskSander2of3.JPG|250px]] Belt sanding in the horizontal orientation (note fence is currently broken) | |||
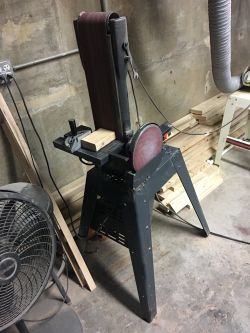
[[File:BeltDiskSander3of3.JPG|250px]] Table positioned for vertical belt sanding | |||
== Being Excellent at the Belt and Disk Sander == | |||
# Only sand wood and never use this machine to grind metals, particularly ferrous materials due to rapid destruction of the sanding belt/disk and risk of fire in the sanding dust environment | |||
# Realize that sanding is only a light finishing step that removes and smooths a minimal amount of stock material while maintaining the sharp abrasive grains in the belt/disk | |||
# Take light "kiss" passes that allow the abrasive to shed sanding dust, stay clean, stay sharp, and do its job at its pace | |||
# Do not abuse the the abrasive sanding belt/disk by forcing the stock into a worn belt/disk that is losing its abrasive | |||
# Taking heavy cuts and using excessive force clogs sanding dust into the abrasive, generating heat to burn your stock, rapidly shedding abrasive and wearing the belt/disk to the bare metal face plate only means you are being stupid | |||
# Realize the wood scrap and sawdust your project makes are still part of your project that you should not leave behind for other people to deal with. Wouldn’t it be nice if the last person did this for you? Wouldn’t this be equally polite for you to do the same for the next person that comes in after you? | |||
# Plan and take the time to clean up after yourself before you leave | |||
== Changing the Sanding Belt (if you don't yet know what you are doing, please ask for help and/or direction) == | |||
# Use a shop vac to alternately vacuum and blow air to clear all sanding dust from inside the pulleys, the top and bottom of the sanding table, the pulley mounts, and the machine frame before proceeding | |||
# Use the two included stamped 1/2" wrenches to loosen tension and adjust the idler pulley in to free the worn belt | |||
# Slide the worn sanding belt off the machine | |||
# install the new sanding belt on the machine paying attention to the proper direction if it is marked on the new belt | |||
# Use the two included stamped 1/2" wrenches to adjust the idler pulley out and initially tension the sanding belt | |||
# Jog the power and observe if the new sanding belt tracks left or right and adjust the left or right side as necessary to cause the belt to track straight | |||
# It may take some fiddling and some time to get the new sanding belt seated under tension to track on center without wandering left or right off of the pulleys | |||
== Changing the Sanding Disk (if you don't yet know what you are doing, please ask for help and/or direction) == | |||
# A worn sanding disk (without abrasive) is USELESS and should be replaced immediately before further use to avoid damaging the rotating metal face plate | |||
# Use one of the 1/2" stamped wrenches to first remove the table (if present at the disk location) by loosening its positioning screw | |||
# Use a flat blade screwdriver to loosen the screws holding the disk guard in place noting that most screw holes are slotted so the guard swings away for access to the worn sanding disk | |||
# Use a shop vac to alternately vacuum and blow air to clean all sanding dust from around the sanding disk, disk guarding, V-belt guarding and the machine frame before proceeding | |||
# Pick at a spot on the circumference of the worn sanding disk to begin to separate it from the metal face plate and then smoothly peel the adhesive-mounted worn sanding disk from the metal face plate | |||
# Use a sharpie to write the yyyy-mm-dd exchange date on the inside (adhesive side) of the worn sanding disk and add it to the historic collection | |||
# Use a liberal amount of acetone on a clean paper towel to remove all adhesive bugger residue from the metal face plate until the surface of the metal disk is smooth and not tacky | |||
# Realize the new sanding disk will be installed with adhesive and do not permit loose sanding dust to adhere into the adhesive joint | |||
# Use a sharpie to write the yyyy-mm-dd "installed new" date and "removed" text on the inside (adhesive side) of the new sanding disk | |||
# Take the new sanding disk outside and spray a full coat of 3M Spray Adhesive to the felt side of the new sanding disk | |||
# Apply adhesive only to the felt backing of the sanding disk and not to the metal face plate | |||
# Bring the new sanding disk back to the machine and when the wet adhesive dries to be tacky, carefully center the sanding disk and adhere it to the metal disk without creases or bubbles | |||
# Apply even hand pressure to assure smooth and full adhesion of the new sanding disk to the metal disk | |||
# Swing the disk guard back into position on the mounting screws and tighten all screws | |||
# Reinstall the table with a nominal 1/16" gap to the surface of the new sanding disk | |||
# Power on the machine and use a scrap of wood to do a quick/light sanding test to observe an even pattern of sanding dust residue on the new sanding disk showing no high or low spots | |||
Latest revision as of 23:29, 17 July 2020

|
Equipment Overview
Usage/Safety
General safety instructions for power tools (from this machine's manual)
- Know your power tool (read and understand the owner's manual before using and understand the specific hazards)
- Ground all tools (use grounded 3-prong plug inserted into proper grounding type receptacle)
- Keep guards in place (and in working order with proper adjustment and alignment)
- Remove adjusting keys and wrenches (form habit to check they are removed from tool before turning on the machine)
- Keep work area clean (cluttered areas and benches invite accidents and floor may be slippery due to sawdust)
- Avoid dangerous environment (don't use power tools in damp or wet locations, keep work area well lighted)
- Keep children away (all visitors should be kept at a safe distance)
- Make workshop kid-proof (consider padlocks, master switches and/or starter keys)
- Don't force tool (it will do the job better and safer at the rate for which it was designed)
- Use right tool (don't force the tool or attachment to do a job it was not designed for)
- Wear proper apparel (don't wear loose clothing, gloves, neckties, or jewelry, contain long hair, roll-up sleeves above the elbow)
- Use safety goggles (must comply with ANSI Z87.1, use face or dust mask and ear protection during extended periods of usage)
- Secure work (use clamps or a vice to hold work when practical as it is safer than using your hand)
- Don't overreach (keep proper footing and balance at all times)
- Maintain tools with care (keep tools sharp and clean for best and safest performance)
- Disconnect tools (before servicing when changing accessories, belts, and disks)
- Avoid accidental starting (make sure switch in in "OFF" position before plugging in)
- Use recommended accessories (consult the manual for recommended accessories, follow instructions, improper accessories may cause hazards)
- Never stand on tool (serious injury could occur if the tool is tipped or if the cutting tool is accidentally contacted)
- Check damaged parts (a damaged guard should be checked for proper function, check alignment of moving parts, binding, breakage, etc.)
- Direction of feed (feed work into a blade or cutter against the direction of rotation of the blade or cutter only)
- Never leave tool running unattended (turn power off and don't leave the tool until it comes to a complete stop)
Watch this good generic introduction safety usage YouTube video (5:48 mm:ss) and/or find additional similar videos
Specifications
Here is a link for the manual:
This equipment uses the following sandpaper belt/disk sizes:
- 6" x 48" sanding belt
- 9" dia. sanding disk
Here is an Amazon link for 6"x48" sanding belts:
Here is an Amazon link for 9" dia. sanding disks:
The motor is 3/4 HP, 3450 RPM, 115 VAC, 60 Hz, single-phase, 10.0 amps
Configurations


Being Excellent at the Belt and Disk Sander
- Only sand wood and never use this machine to grind metals, particularly ferrous materials due to rapid destruction of the sanding belt/disk and risk of fire in the sanding dust environment
- Realize that sanding is only a light finishing step that removes and smooths a minimal amount of stock material while maintaining the sharp abrasive grains in the belt/disk
- Take light "kiss" passes that allow the abrasive to shed sanding dust, stay clean, stay sharp, and do its job at its pace
- Do not abuse the the abrasive sanding belt/disk by forcing the stock into a worn belt/disk that is losing its abrasive
- Taking heavy cuts and using excessive force clogs sanding dust into the abrasive, generating heat to burn your stock, rapidly shedding abrasive and wearing the belt/disk to the bare metal face plate only means you are being stupid
- Realize the wood scrap and sawdust your project makes are still part of your project that you should not leave behind for other people to deal with. Wouldn’t it be nice if the last person did this for you? Wouldn’t this be equally polite for you to do the same for the next person that comes in after you?
- Plan and take the time to clean up after yourself before you leave
Changing the Sanding Belt (if you don't yet know what you are doing, please ask for help and/or direction)
- Use a shop vac to alternately vacuum and blow air to clear all sanding dust from inside the pulleys, the top and bottom of the sanding table, the pulley mounts, and the machine frame before proceeding
- Use the two included stamped 1/2" wrenches to loosen tension and adjust the idler pulley in to free the worn belt
- Slide the worn sanding belt off the machine
- install the new sanding belt on the machine paying attention to the proper direction if it is marked on the new belt
- Use the two included stamped 1/2" wrenches to adjust the idler pulley out and initially tension the sanding belt
- Jog the power and observe if the new sanding belt tracks left or right and adjust the left or right side as necessary to cause the belt to track straight
- It may take some fiddling and some time to get the new sanding belt seated under tension to track on center without wandering left or right off of the pulleys
Changing the Sanding Disk (if you don't yet know what you are doing, please ask for help and/or direction)
- A worn sanding disk (without abrasive) is USELESS and should be replaced immediately before further use to avoid damaging the rotating metal face plate
- Use one of the 1/2" stamped wrenches to first remove the table (if present at the disk location) by loosening its positioning screw
- Use a flat blade screwdriver to loosen the screws holding the disk guard in place noting that most screw holes are slotted so the guard swings away for access to the worn sanding disk
- Use a shop vac to alternately vacuum and blow air to clean all sanding dust from around the sanding disk, disk guarding, V-belt guarding and the machine frame before proceeding
- Pick at a spot on the circumference of the worn sanding disk to begin to separate it from the metal face plate and then smoothly peel the adhesive-mounted worn sanding disk from the metal face plate
- Use a sharpie to write the yyyy-mm-dd exchange date on the inside (adhesive side) of the worn sanding disk and add it to the historic collection
- Use a liberal amount of acetone on a clean paper towel to remove all adhesive bugger residue from the metal face plate until the surface of the metal disk is smooth and not tacky
- Realize the new sanding disk will be installed with adhesive and do not permit loose sanding dust to adhere into the adhesive joint
- Use a sharpie to write the yyyy-mm-dd "installed new" date and "removed" text on the inside (adhesive side) of the new sanding disk
- Take the new sanding disk outside and spray a full coat of 3M Spray Adhesive to the felt side of the new sanding disk
- Apply adhesive only to the felt backing of the sanding disk and not to the metal face plate
- Bring the new sanding disk back to the machine and when the wet adhesive dries to be tacky, carefully center the sanding disk and adhere it to the metal disk without creases or bubbles
- Apply even hand pressure to assure smooth and full adhesion of the new sanding disk to the metal disk
- Swing the disk guard back into position on the mounting screws and tighten all screws
- Reinstall the table with a nominal 1/16" gap to the surface of the new sanding disk
- Power on the machine and use a scrap of wood to do a quick/light sanding test to observe an even pattern of sanding dust residue on the new sanding disk showing no high or low spots
