Spooky Cat with 2 LEDs: Difference between revisions
Jump to navigation
Jump to search
Notyou007a (talk | contribs) No edit summary |
Notyou007a (talk | contribs) mNo edit summary |
||
| Line 21: | Line 21: | ||
=Upgrades= | =Upgrades= | ||
*Spooky Cat now lives near the | *Spooky Cat now lives on some conduit near the Vinyl Cutter. | ||
*Spooky Cat's eyes are very bright, which is part of why it's so spooky, however, if anyone knows about simple circuits that can variably limit current, that could be applied to either smoothly or discretely dim Spooky Cat's eyes, it would be a helpful Cat upgrade. | *Spooky Cat's eyes are very bright, which is part of why it's so spooky, however, if anyone knows about simple circuits that can variably limit current, that could be applied to either smoothly or discretely dim Spooky Cat's eyes, it would be a helpful Cat upgrade. | ||
Latest revision as of 13:30, 17 February 2016

|
Equipment Overview
|
 |
Construction
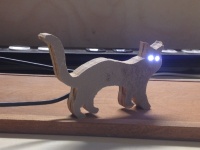
Spooky Cat was cut out of a scrap of cabinet from the woodshop, which was painted brown on one side and white on the other. The shape was cut using the band saw.
Two white LEDs were hot-glued into eye sockets drilled out of the wood on the drill press.
The LEDs are illuminated with 5v power from the attached USB cable, which was scavenged out of the boneyard.
Current-limiting resistors were calculated using This LED wizard.
Upgrades
- Spooky Cat now lives on some conduit near the Vinyl Cutter.
- Spooky Cat's eyes are very bright, which is part of why it's so spooky, however, if anyone knows about simple circuits that can variably limit current, that could be applied to either smoothly or discretely dim Spooky Cat's eyes, it would be a helpful Cat upgrade.