1st Inning: Difference between revisions
Jump to navigation
Jump to search
Notyou007a (talk | contribs) No edit summary |
|||
| (4 intermediate revisions by one other user not shown) | |||
| Line 1: | Line 1: | ||
__NOTOC__ | |||
==Introduction== | ==Introduction== | ||
'''Arduino and Breadboard setup, Power''' | '''Arduino and Breadboard setup, Power''' | ||
| Line 8: | Line 9: | ||
*USB cable for Freeduino | *USB cable for Freeduino | ||
*Freeduino development software - [http://www.arduino.cc/en/Main/Software download here!] | *Freeduino development software - [http://www.arduino.cc/en/Main/Software download here!] | ||
*Solderless Breadboard | *Solderless Breadboard [[File:Breadboard_datasheet.pdf]] | ||
*Hookup wire 22gauge solid | *Hookup wire 22gauge solid | ||
| Line 31: | Line 32: | ||
==Fritzing== | ==Fritzing== | ||
Here is a diagram of what your breadboard should look like. Before connecting it to the Arduino, please have an instructor check it out. We do not want to accidentally connect 5V to Ground! | |||
[[File:lvl1-Inning1_bb.jpg]] | |||
==Code== | ==Code== | ||
| Line 36: | Line 40: | ||
==Troubleshooting== | ==Troubleshooting== | ||
[[Category:HOWTO]] | |||
Latest revision as of 23:45, 25 June 2015
Introduction
Arduino and Breadboard setup, Power
This inning you will learn how to set up your Freeduino and breadboard for doing prototyping and these experiments.
Components Needed
- Freeduino or Arduino or clone
- USB cable for Freeduino
- Freeduino development software - download here!
- Solderless Breadboard File:Breadboard datasheet.pdf
- Hookup wire 22gauge solid
How to
- Downloadthe Arduino software and install.
- Hook up your Freeduino to the USB cable and your computer.
- Test this setup by running the Arduino program. Run the sketch (Arduino program) File->examples->digital->blink
- If you setup works, then you should see the led on the Arduino that is soldered onto the board, blinking. If not, troubleshoot below - or call over an LVL1 member to help out!
NEXT
- Hook up your breadboard power and ground.
- You will need to cut and remove the insulation for several wires, just do this as needed.
- Use red wires for your positive leads and black for your ground leads.
- Positive leads are 5V
- Ground are 0V
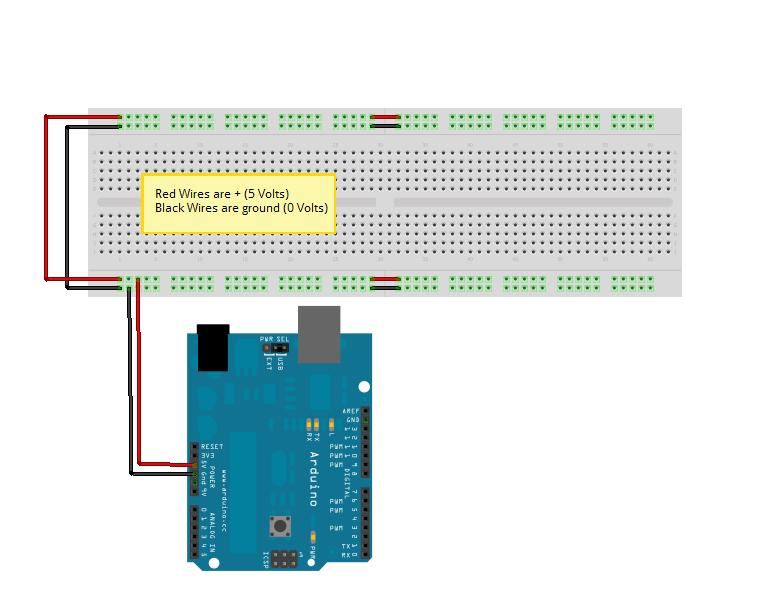
- Hook up the wires as shown in the Fritzing picture below
- Do not hook the wires to your Arduino until they have been checked by an instructor.
Schematic
n/a
Fritzing
Here is a diagram of what your breadboard should look like. Before connecting it to the Arduino, please have an instructor check it out. We do not want to accidentally connect 5V to Ground!
Code
n/a
