Difference between revisions of "5th Inning"
(→Code) |
|||
| Line 92: | Line 92: | ||
pinMode(inPin, INPUT); // declare pushbutton as input | pinMode(inPin, INPUT); // declare pushbutton as input | ||
| − | + | digitalWrite(inPin,HIGH); //engages internal pullup resistor | |
} | } | ||
| Line 112: | Line 112: | ||
} | } | ||
| + | |||
| + | |||
</pre> | </pre> | ||
Revision as of 14:31, 19 May 2010
Introduction
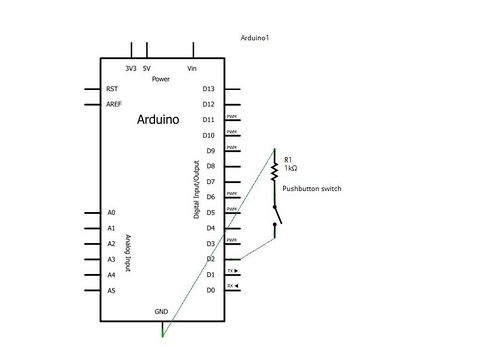
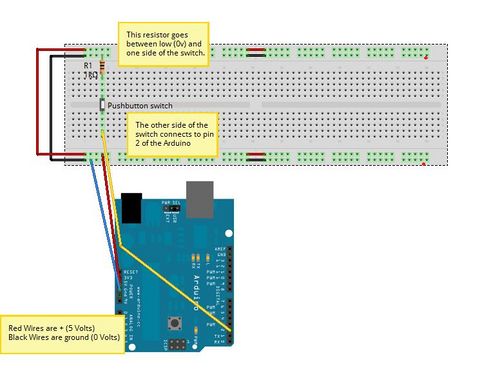
Pushbutton Switches Switches are probably the most common human to computer input. Fortunatly they are easy to do. This circuit uses a pull-up resistor and a pushbutton switch to light an LED.
Components Needed
- Freeduino or Arduino or clone
- USB cable for Freeduino
- Freeduino development software - download here!
- Solderless Breadboard
- Hookup wire 22gauge solid
- Pushbutton Switch
- Soldering Iron and Solder to solder wires to switch
- 1 kOhm resistor (Brown-Black-Red)
How to
- For our workshop, you will have to solder some hookup wire to one of your pushbutton switches. Just strip back a half an inch of wire or so, stick it through the hole on the switch lead and solder. You will have help. It is easy.
- Follow the fritzing diagram and hook up the circuit.
- Cut and paste your code and run!
Schematic
Fritzing
Code
Cut and paste into your Arduino code environment. This code will light the LED connected to pin 2 when the button is pushed. If you removed the led from Inning 2, do not worry, pin 13 has a soldered on LED on most Arduinos and clones. Pin 2 was used, so the switch does not have to be removed for future experiments.
/* Basic Digital Read
 * ------------------
 *
 * turns on and off a light emitting diode(LED) connected to digital
 * pin 13, when pressing a pushbutton attached to pin 2. It illustrates the
 * concept of Active-Low, which consists in connecting buttons using a
 * 1K to 10K pull-up resistor.
 *
 * Created 1 December 2005
 * copyleft 2005 DojoDave <http://www.0j0.org>
 * http://arduino.berlios.de
 *
 */

int ledPin = 13; // choose the pin for the LED
int inPin = 2;   // choose the input pin (for a pushbutton)
int val = 0;     // variable for reading the pin status

void setup() {
  pinMode(ledPin, OUTPUT);  // declare LED as output
  pinMode(inPin, INPUT);    // declare pushbutton as input
}

void loop(){
  val = digitalRead(inPin);  // read input value
  if (val == HIGH) {         // check if the input is HIGH (button released)
    digitalWrite(ledPin, LOW);  // turn LED OFF
  } else {
    digitalWrite(ledPin, HIGH);  // turn LED ON
  }
}
Run this code instead if you have the LCD hooked up. It says whether the button is up or down on the neato display!
//This switch code looks at the pushbutton pin (2)
//and resets the counter if it is pressed!
//bpw 5/11/10


// include the library code:
#include <LiquidCrystal.h>

// initialize the library with the numbers of the interface pins
LiquidCrystal lcd(7, 8, 9, 10, 11, 12);

int inPin = 2;   // choose the input pin (for a pushbutton)
int val = 0;     // variable for reading the pin status


void setup() {
  // set up the LCD's number of rows and columns:
  lcd.begin(16, 2);
  // Print a message to the LCD.
  lcd.print("hello, world!");

  pinMode(inPin, INPUT);    // declare pushbutton as input
digitalWrite(inPin,HIGH);  //engages internal pullup resistor
}

void loop() {
  // set the cursor to column 0, line 1
  // (note: line 1 is the second row, since counting begins with 0):
  lcd.setCursor(0, 1);
  // print the number of seconds since reset:
  lcd.print(millis()/1000);

  lcd.setCursor(8, 1);  //col 8, row 1
  //code for button pressed!
  val = digitalRead(inPin);  // read input value
  if (val == LOW) {         // check if the input is HIGH (button released)
    lcd.print("DOWN");
  } else {
    lcd.print("UP  ");
  }

}
Troubleshooting
Resources
See http://www.arduino.cc/en/Tutorial/Pushbutton for more information on pushbutton switches.
Here is the link to the LCD Library http://arduino.cc/en/Reference/LiquidCrystal?from=Tutorial.LCDLibrary

