Drill Press - Buffalo Forge Number 15: Difference between revisions
Jump to navigation
Jump to search
No edit summary |
No edit summary |
||
| (7 intermediate revisions by the same user not shown) | |||
| Line 12: | Line 12: | ||
== Usage/Safety == | == Usage/Safety == | ||
General safety instructions for power tools | General safety instructions for power tools<br /> | ||
# Know your power tool (read and understand the owner's manual before using and understand the specific hazards)<br /> | |||
# Ground all tools (use grounded 3-prong plug inserted into proper grounding type receptacle)<br /> | |||
# Keep guards in place (and in working order with proper adjustment and alignment)<br /> | |||
# Remove adjusting keys and wrenches (form habit to check they are removed from tool before turning on the machine)<br /> | |||
# Keep work area clean (cluttered areas and benches invite accidents and floor may be slippery due to sawdust)<br /> | |||
# Avoid dangerous environment (don't use power tools in damp or wet locations, keep work area well lighted)<br /> | |||
# Keep children away (all visitors should be kept at a safe distance)<br /> | |||
# Make workshop kid-proof (consider padlocks, master switches and/or starter keys)<br /> | |||
# Don't force tool (it will do the job better and safer at the rate for which it was designed)<br /> | |||
# Use right tool (don't force the tool or attachment to do a job it was not designed for)<br /> | |||
# Wear proper apparel (don't wear loose clothing, gloves, neckties, or jewelry, contain long hair, roll-up sleeves above the elbow)<br /> | |||
# Use safety goggles (must comply with ANSI Z87.1, use face or dust mask and ear protection during extended periods of usage)<br /> | |||
# Secure work (use clamps or a vice to hold work when practical as it is safer than using your hand)<br /> | |||
# Don't overreach (keep proper footing and balance at all times)<br /> | |||
# Maintain tools with care (keep tools sharp and clean for best and safest performance)<br /> | |||
# Disconnect tools (before servicing when changing accessories, belts, and disks)<br /> | |||
# Avoid accidental starting (make sure switch in in "OFF" position before plugging in)<br /> | |||
# Use recommended accessories (consult the manual for recommended accessories, follow instructions, improper accessories may cause hazards)<br /> | |||
# Never stand on tool (serious injury could occur if the tool is tipped or if the cutting tool is accidentally contacted)<br /> | |||
# Check damaged parts (a damaged guard should be checked for proper function, check alignment of moving parts, binding, breakage, etc.)<br /> | |||
# Direction of feed (feed work into a blade or cutter against the direction of rotation of the blade or cutter only)<br /> | |||
# Never leave tool running unattended (turn power off and don't leave the tool until it comes to a complete stop)<br /> | |||
Watch this good generic introduction safety usage YouTube video (12:27 mm:ss) and/or find additional similar videos | Watch this good generic introduction safety usage YouTube video (12:27 mm:ss) and/or find additional similar videos | ||
* https://www.youtube.com/watch?v=Gby7a1hUAPg | * https://www.youtube.com/watch?v=Gby7a1hUAPg | ||
== Specifications == | |||
Here is a link for the manual: | Here is a link for the manual: | ||
* https://drive.google.com/file/d/ | * https://drive.google.com/file/d/1EK5MmMQB_wEcPeUIU3VVBhkvWqe3Nyj8/view?usp=sharing | ||
The chuck is 1/2" max | |||
The motor is 1/3 HP, 1725 RPM, 115 VAC, 60 Hz, single-phase, 5.0 amp | |||
== Photos == | |||
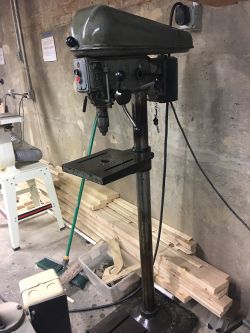
[[File:BuffaloForgeDrillPress1of2.JPG|250px]] This right-side view shows the quill feed handle and the depth stop feature | |||
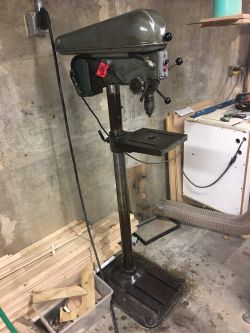
[[File:BuffaloForgeDrillPress2of2.JPG|250px]] This left-side view shows the quill lock, the headstock and table adjusting screws and the quill retract spring knob (no need to adjust) | |||
== Being Excellent at the Drill Press == | |||
# Realize that drill bits reside in known labeled box locations | |||
# Never leave your drill bit in the spindle when you are done | |||
# Always return the drill bit(s) you use back in their proper labeled box location(s) and leave the drill chuck empty for the next user | |||
# Plan your work and consider to use a spoil board to avoid damaging the table of the drill press | |||
# Realize the stock scrap and sawdust/chips your project makes are still part of your project that you should not leave behind for other people to deal with. Wouldn’t it be nice if the last person did this for you? Wouldn’t this be equally polite for you to do the same for the next person that comes in after you? | |||
# Plan and take the time to clean up after yourself before you leave, it only takes a few minutes and is thre right thing to do | |||
# Always brush dust off the machine from top belt cover, to headstock, table, column, and base when you are done | |||
# This is a vintage machine that has given reliable service for over 60 years | |||
# It is made available for considerate LVL1 members to use and enjoy, please don't abuse it or overload it | |||
# It is nice to give it a WD-40 rub down with a shop rag to remove the last traces of dust and protect its metal | |||
Latest revision as of 23:31, 17 July 2020

|
Equipment Overview
Usage/Safety
General safety instructions for power tools
- Know your power tool (read and understand the owner's manual before using and understand the specific hazards)
- Ground all tools (use grounded 3-prong plug inserted into proper grounding type receptacle)
- Keep guards in place (and in working order with proper adjustment and alignment)
- Remove adjusting keys and wrenches (form habit to check they are removed from tool before turning on the machine)
- Keep work area clean (cluttered areas and benches invite accidents and floor may be slippery due to sawdust)
- Avoid dangerous environment (don't use power tools in damp or wet locations, keep work area well lighted)
- Keep children away (all visitors should be kept at a safe distance)
- Make workshop kid-proof (consider padlocks, master switches and/or starter keys)
- Don't force tool (it will do the job better and safer at the rate for which it was designed)
- Use right tool (don't force the tool or attachment to do a job it was not designed for)
- Wear proper apparel (don't wear loose clothing, gloves, neckties, or jewelry, contain long hair, roll-up sleeves above the elbow)
- Use safety goggles (must comply with ANSI Z87.1, use face or dust mask and ear protection during extended periods of usage)
- Secure work (use clamps or a vice to hold work when practical as it is safer than using your hand)
- Don't overreach (keep proper footing and balance at all times)
- Maintain tools with care (keep tools sharp and clean for best and safest performance)
- Disconnect tools (before servicing when changing accessories, belts, and disks)
- Avoid accidental starting (make sure switch in in "OFF" position before plugging in)
- Use recommended accessories (consult the manual for recommended accessories, follow instructions, improper accessories may cause hazards)
- Never stand on tool (serious injury could occur if the tool is tipped or if the cutting tool is accidentally contacted)
- Check damaged parts (a damaged guard should be checked for proper function, check alignment of moving parts, binding, breakage, etc.)
- Direction of feed (feed work into a blade or cutter against the direction of rotation of the blade or cutter only)
- Never leave tool running unattended (turn power off and don't leave the tool until it comes to a complete stop)
Watch this good generic introduction safety usage YouTube video (12:27 mm:ss) and/or find additional similar videos
Specifications
Here is a link for the manual:
The chuck is 1/2" max
The motor is 1/3 HP, 1725 RPM, 115 VAC, 60 Hz, single-phase, 5.0 amp
Photos


Being Excellent at the Drill Press
- Realize that drill bits reside in known labeled box locations
- Never leave your drill bit in the spindle when you are done
- Always return the drill bit(s) you use back in their proper labeled box location(s) and leave the drill chuck empty for the next user
- Plan your work and consider to use a spoil board to avoid damaging the table of the drill press
- Realize the stock scrap and sawdust/chips your project makes are still part of your project that you should not leave behind for other people to deal with. Wouldn’t it be nice if the last person did this for you? Wouldn’t this be equally polite for you to do the same for the next person that comes in after you?
- Plan and take the time to clean up after yourself before you leave, it only takes a few minutes and is thre right thing to do
- Always brush dust off the machine from top belt cover, to headstock, table, column, and base when you are done
- This is a vintage machine that has given reliable service for over 60 years
- It is made available for considerate LVL1 members to use and enjoy, please don't abuse it or overload it
- It is nice to give it a WD-40 rub down with a shop rag to remove the last traces of dust and protect its metal
