Digital for Arduino
Digital electronics for Arduino Workshop. Taught and designed by Brian Wagner.
SIGN UP HERE http://digitalarduino.eventbrite.com
We will build and program an electronic game and in the process learn LED's, tri-color LED's, pushbutton switches, speakers and Arduino programming.
You must bring your own Arduino or clone!
You will need to have an Arduino or an Arduino clone to participate in this workshop. They can be purchased online (but be aware of shipping times) or at a local Radio shack http://www.radioshack.com/product/index.jsp?productId=12268262 You will need to have a USB cable to connect to your computer.
Other Arduino retailers
Adafruit http://www.adafruit.com/products/50
Sparkfun http://www.sparkfun.com/products/9950
Solarbotics (Canada - can have slower shipping) http://www.solarbotics.com/products/28920/
Seeed studios http://www.seeedstudio.com/depot/seeeduino-v30-atmega-328p-p-669.html?cPath=132_133 Cheapest around, but they come from HK so they take a while to get.
Again, do not forget the USB cable
You can also use a serial based Arduino such as the Diavolina ($13!!!), but you need a $20 cable! http://evilmadscience.com/productsmenu/tinykitlist/180
You will also need to bring a laptop computer for programming your Arduino. We will show you how!
All other supplies are included in the cost of the workshop (wire, leds, switch, solderless breadboard, speaker, etc)
LVL1 has snacks and sodas available for purchase, but you can bring your own if you want.
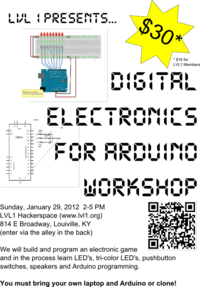
Here is the Poster so you can print and hang in your favorite coffee shop. File:Digital.pdf
The Class
As we work through the parts below, do not remove the parts as you go. I have set this up so that by the end, the whole circuit game is built! I have taken parts of a couple of other classes to create this class. For the most part, the code is the same, but sometimes I had to rewire the circuit so the code has changed. I have posted the changes.
Part 1
Install the Arduino software and get your development system going. Be sure to run power and ground to the Arduino.
http://wiki.lvl1.org/1st_Inning
Part 2
Blinky Light - Get one LED blinking. This Blinkey light is hooked up to pin 13, but this is not the last light in the cylon lights, so please give room on your breadboard for one more LED to the left.
You can run the code in the Arduino development File->Examples->Basics->Blink. This blinking code is a very useful way to see if your Arduino is working. Some Arduino boards have a LED already installed to Pin D13 just for testing purposes.
http://wiki.lvl1.org/2nd_Inning
Part 3
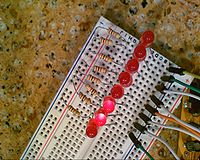
Cylon lights - Battlestar Galactica or KITT from Knight Rider - take your pick. In this part we will use pin A0 instead of digital pin 6. I need the PWM capabilities of digital pin 6 for the tri-color LED. Pin A0 (as well as all the analog pins) can be used as digital pins. A0 can be thought of as D14.
Go ahead and build the circuit on the breadboard. You will want to keep the LEDS close to each other. I spaced them two columns apart from each other on the breadboard.
http://wiki.lvl1.org/Cylon_LEDs
And the code specific to having A0 used instead of D6:
//Code for Cylon - I am sure this could be more elegant!
//bpw 2/11/22
//modified for Pin A0 bpw 1/28/12

int pinled1 = 7;
int pinled2 = 8;
int pinled3 = 9;
int pinled4 = 10;
int pinled5 = 11;
int pinled6 = 12;
int pinled7 = 13;
int pinled8 = 14;  //Pin 14 is the same as A0.  You can use A0 as a digital pin!
int t = 50;
void setup()
{
pinMode(pinled1, OUTPUT);
pinMode(pinled2, OUTPUT);
pinMode(pinled3, OUTPUT);
pinMode(pinled4, OUTPUT);
pinMode(pinled5, OUTPUT);
pinMode(pinled6, OUTPUT);
pinMode(pinled7, OUTPUT);
pinMode(pinled8, OUTPUT);
}

void loop()
{
digitalWrite(pinled1, HIGH);
delay(t);
digitalWrite(pinled2, HIGH);
delay(t);
digitalWrite(pinled1, LOW);
delay(t);
digitalWrite(pinled3, HIGH);
delay(t);
digitalWrite(pinled2, LOW);
delay(t);
digitalWrite(pinled4, HIGH);
delay(t);
digitalWrite(pinled3, LOW);
delay(t);
digitalWrite(pinled5, HIGH);
delay(t);
digitalWrite(pinled4, LOW);
delay(t);
digitalWrite(pinled6, HIGH);
delay(t);
digitalWrite(pinled5, LOW);
delay(t);
digitalWrite(pinled7, HIGH);
delay(t);
digitalWrite(pinled6, LOW);
delay(t);
digitalWrite(pinled8, HIGH);
delay(t);
digitalWrite(pinled7, LOW);
delay(t);
digitalWrite(pinled7, HIGH);
delay(t);
digitalWrite(pinled8, LOW);
delay(t);
digitalWrite(pinled6, HIGH);
delay(t);
digitalWrite(pinled7, LOW);
delay(t);
digitalWrite(pinled5, HIGH);
delay(t);
digitalWrite(pinled6, LOW);
delay(t);
digitalWrite(pinled4, HIGH);
delay(t);
digitalWrite(pinled5, LOW);
delay(t);
digitalWrite(pinled3, HIGH);
delay(t);
digitalWrite(pinled4, LOW);
delay(t);
digitalWrite(pinled2, HIGH);
delay(t);
digitalWrite(pinled3, LOW);
delay(t);
digitalWrite(pinled1, HIGH);
delay(t);
digitalWrite(pinled2, LOW);
delay(t);

}
Part 4
Tri-Color LED. The Tricolor LED is set to use pins D6, D5, and D3. Those are Pulse Width Modulation pins. The Common Cathode is the longer pin and it is connected to Ground. I accidentally gave you all 100K ohm resistors, so I need to swap those out with 1K resistors during the class.
http://wiki.lvl1.org/3rd_Inning
Here is the code to check your tricolor LED
//This code comes from...
//http://www.arduino.cc/cgi-bin/yabb2/YaBB.pl?num=1207331496
//modified to just go through a pretty color loop!
//use tools->serial monitor to watch the values
//bpw 5/10/10


int rpin = 3;    // RED pin of the LED to PWM pin 3
int gpin = 5;  // GREEN pin of the LED to PWM pin 5
int bpin = 6;   // BLUE pin of the LED to PWM pin 6

int r=0, g=0, b=0;
float h;


void h2rgb(float h, int &R, int &G, int &B);

void setup()                    // run once, when the sketch starts
{
   Serial.begin(9600);
}


void loop()                     // run over and over again
{

  for (int val = 0; val <1024; val++) {
    h = ((float)val)/1024;

    h2rgb(h,r,g,b);
    Serial.println (val) ;
    Serial.println (h) ;
    Serial.println (r) ;
    Serial.println (g) ;
    Serial.println (b) ;
    Serial.println ("  ") ;

    analogWrite(rpin, r);
    analogWrite(gpin, g);
    analogWrite(bpin, b);
    //delay(50);
  }
}

void h2rgb(float H, int& R, int& G, int& B) {

  int var_i;
  float S=1, V=1, var_1, var_2, var_3, var_h, var_r, var_g, var_b;

  if ( S == 0 )                       //HSV values = 0 ÷ 1
  {
    R = V * 255;
    G = V * 255;
    B = V * 255;
  }
  else
  {
    var_h = H * 6;
    if ( var_h == 6 ) var_h = 0;      //H must be < 1
    var_i = int( var_h ) ;            //Or ... var_i = floor( var_h )
    var_1 = V * ( 1 - S );
    var_2 = V * ( 1 - S * ( var_h - var_i ) );
    var_3 = V * ( 1 - S * ( 1 - ( var_h - var_i ) ) );

    if      ( var_i == 0 ) {
      var_r = V     ;
      var_g = var_3 ;
      var_b = var_1 ;
    }
    else if ( var_i == 1 ) {
      var_r = var_2 ;
      var_g = V     ;
      var_b = var_1 ;
    }
    else if ( var_i == 2 ) {
      var_r = var_1 ;
      var_g = V     ;
      var_b = var_3 ;
    }
    else if ( var_i == 3 ) {
      var_r = var_1 ;
      var_g = var_2 ;
      var_b = V     ;
    }
    else if ( var_i == 4 ) {
      var_r = var_3 ;
      var_g = var_1 ;
      var_b = V     ;
    }
    else                   {
      var_r = V     ;
      var_g = var_1 ;
      var_b = var_2 ;
    }

    R = (1-var_r) * 255;                  //RGB results = 0 ÷ 255
    G = (1-var_g) * 255;
    B = (1-var_b) * 255;
  }
}
Part 5
Push Button Switch
http://wiki.lvl1.org/5th_Inning
Part 6
Speaker - Lets make some noise
http://wiki.lvl1.org/9th_Inning
Part 7
Put it all together and make a game

