|
|
| Line 436: |
Line 436: |
| | | | |
| | * [[Lego Interactive Brick Program]] | | * [[Lego Interactive Brick Program]] |
| − |
| |
| − | Code
| |
| − | ''
| |
| − | //Demonstration Program for Interactive LCD Touch Screen Lego 70455 Interface
| |
| − |
| |
| − | #include <tinyFAT.h>
| |
| − | #include <UTFT.h>
| |
| − | #include <UTFT_tinyFAT.h>
| |
| − | #include <UTouch.h>
| |
| − | #include <LegoTechnic.h>
| |
| − |
| |
| − | // Declare which fonts we will be using
| |
| − | extern uint8_t SmallFont[];
| |
| − |
| |
| − | UTFT LEGO_Display(ITDB32S, 38, 39, 40, 41); // Remember to change the model parameter to suit your display module!
| |
| − | UTFT_tinyFAT LEGO_Files(&LEGO_Display);
| |
| − | UTouch LEGO_Touch( 6, 5, 4, 3, 2);
| |
| − |
| |
| − | LegoTechnic brick(8, 9, 10, 11, 12, 13, 0, 1);
| |
| − |
| |
| − | int picsize_x, picsize_y;
| |
| − |
| |
| − | word resource;
| |
| − |
| |
| − | // Display locations
| |
| − | int x_HotSpot=85;
| |
| − | int y_HotSpot=163;
| |
| − | int HotSpot_width=202;
| |
| − | int HotSpot_height=72;
| |
| − |
| |
| − | int x_slider = 86;
| |
| − | int y_slider = 173;
| |
| − | int slider_space = 19;
| |
| − | int slider_width = 10;
| |
| − | int slider_height = 10;
| |
| − |
| |
| − | int x_indicator = 259;
| |
| − | int y_indicator = 59;
| |
| − | int indicator_space = 34;
| |
| − | int indicator_width = 5;
| |
| − | int indicator_height = 5;
| |
| − |
| |
| − | int x_button = 277;
| |
| − | int y_button = 73;
| |
| − | int button_width = 19;
| |
| − | int button_height = 40;
| |
| − |
| |
| − | int x_output = 86;
| |
| − | int y_output = 140;
| |
| − | int output_space = 107;
| |
| − | int output_width = 200;
| |
| − | int output_height = 10;
| |
| − |
| |
| − | void setup()
| |
| − | {
| |
| − | // Initialize LEGO brick
| |
| − | brick.Port_Initialize();
| |
| − |
| |
| − | // Prepare Display
| |
| − | LEGO_Display.InitLCD();
| |
| − | LEGO_Display.clrScr();
| |
| − | LEGO_Display.setColor(255,255,255);
| |
| − | LEGO_Display.setFont(SmallFont);
| |
| − | picsize_x=LEGO_Display.getDisplayXSize();
| |
| − | picsize_y=LEGO_Display.getDisplayYSize();
| |
| − |
| |
| − | // Prepare Touch Screen
| |
| − | LEGO_Touch.InitTouch();
| |
| − | LEGO_Touch.setPrecision (PREC_MEDIUM);
| |
| − | LEGO_Display.setBackCol or(0, 0, 255);
| |
| − |
| |
| − | // LEGO Library has Serial Monitor Functions
| |
| − | Serial.begin(9600);
| |
| − |
| |
| − | // Load Interface Image
| |
| − | file.initFAT();
| |
| − | resource=LEGO_Files.loadBitmap(0, 0, picsize_x, picsize_y, "LEGOPIC.RAW");
| |
| − |
| |
| − | }
| |
| − |
| |
| − | void loop()
| |
| − | {
| |
| − | int hold_value[6]={0,0,0,0,0,0};
| |
| − | int x,y;
| |
| − | int Previous_I0, Present_I0;
| |
| − | int Previous_I1, Present_I1;
| |
| − | int button_value;
| |
| − |
| |
| − | // Draw Screen Elements
| |
| − | Sliders();
| |
| − | Outputs();
| |
| − | brick.Verbose(LOW);
| |
| − | UpdateDisplay();
| |
| − |
| |
| − | Previous_I0 = -1;
| |
| − | Previous_I1 = -1;
| |
| − |
| |
| − | while (true)
| |
| − | {
| |
| − |
| |
| − | // Check for change to input values
| |
| − | Present_I0 = brick.Input_Port(6);
| |
| − | Present_I1 = brick.Input_Port(7);
| |
| − | if (Present_I0 != Previous_I0)
| |
| − | {
| |
| − | Previous_I0 = Present_I0;
| |
| − | DrawIndicatorValue(6,Present_I0);
| |
| − | DrawOutputValue(0,Present_I0);
| |
| − | }
| |
| − | if (Present_I1 != Previous_I1)
| |
| − | {
| |
| − | Previous_I1 = Present_I1;
| |
| − | DrawIndicatorValue(7,Present_I1);
| |
| − | DrawOutputValue(1,Present_I1);
| |
| − | }
| |
| − |
| |
| − | // Test for touch screen input
| |
| − | if (LEGO_Touch.dataAvailable())
| |
| − | {
| |
| − | LEGO_Touch.read();
| |
| − | x=LEGO_Touch.getX();
| |
| − | y=LEGO_Touch.getY();
| |
| − | EvaluateTouch(x,y);
| |
| − | delay(100);
| |
| − | while(LEGO_Touch.dataAvailable())
| |
| − | {
| |
| − | LEGO_Touch.read();
| |
| − | }
| |
| − | }
| |
| − | }
| |
| − |
| |
| − | }
| |
| − |
| |
| − | // Determine if touch screen input is within an active zone
| |
| − | void EvaluateTouch(int x, int y)
| |
| − | {
| |
| − | if ((x >= x_HotSpot) && (x <= x_HotSpot + HotSpot_width))
| |
| − | if ((y >= y_HotSpot) && (y <= y_HotSpot + HotSpot_height))
| |
| − | EvaluateSliders(x,y);
| |
| − |
| |
| − | if ((x >= x_button) && (x <= x_button + button_width))
| |
| − | if ((y >= y_button) && (y <= y_button + button_height))
| |
| − | ExecuteButton(x,y);
| |
| − | }
| |
| − |
| |
| − | // Reset Button for Outputs
| |
| − | void ExecuteButton(int x,int y)
| |
| − | {
| |
| − | for(int x=0; x< 6; ++x)
| |
| − | {
| |
| − | EraseSliderValue(x, int (brick.Port_PWM_Value(x)/25));
| |
| − | brick.PWM_Port(x, 0);
| |
| − | }
| |
| − | UpdateDisplay();
| |
| − | }
| |
| − |
| |
| − | // Determine which slider was "touched"
| |
| − | void EvaluateSliders(int x,int y)
| |
| − | {
| |
| − | int line_number = (5 - (y-y_HotSpot)/(slider_height+1));
| |
| − | int line_value = (x-x_HotSpot)/(slider_space);
| |
| − |
| |
| − | EraseSliderValue(line_number, int (brick.Port_PWM_Value(line_number)/25));
| |
| − | brick.PWM_Port(line_number, int (line_value * 25));
| |
| − | DrawSliderValue(line_number, line_value);
| |
| − | DrawIndicatorValue(line_number,brick.Port_PWM_Value(line_number));
| |
| − |
| |
| − | }
| |
| − |
| |
| − | // Update Screen Elements
| |
| − | void UpdateDisplay()
| |
| − | {
| |
| − | for(int x=0;x<8;++x)
| |
| − | {
| |
| − | if (x < 6)
| |
| − | {
| |
| − | DrawSliderValue(x,brick.Port_PWM_Value(x));
| |
| − | DrawIndicatorValue(x,brick.Port_PWM_Value(x));
| |
| − | }
| |
| − | else
| |
| − | DrawIndicatorValue(x,brick.Input_Port(x));
| |
| − | }
| |
| − | }
| |
| − |
| |
| − | // Draw All Sliders
| |
| − | void Sliders()
| |
| − | {
| |
| − | for(int x=0; x < 6; ++x)
| |
| − | {
| |
| − | y_slider = 224-(x*(slider_height+2));
| |
| − | DrawSlider(x);
| |
| − | DrawSliderValue(x,0);
| |
| − | }
| |
| − | }
| |
| − |
| |
| − | // Draw each Slider
| |
| − | void DrawSlider(int line)
| |
| − | {
| |
| − | String label=" Line ";
| |
| − | label.concat(char(48+line));
| |
| − | LEGO_Display.setColor(255,255,255);
| |
| − | LEGO_Display.setBackColor(0,0,0);
| |
| − | LEGO_Display.print(label, LEFT,224-(line*(slider_height+2)));
| |
| − | LEGO_Display.print(" OFF", 53, 224-(line*(slider_height+2)));
| |
| − | LEGO_Display.print(" MAX", RIGHT, 224-(line*(slider_height+2)));
| |
| − | LEGO_Display.setColor(0,0,0);
| |
| − | LEGO_Display.drawLine(x_slider,224-(line*(slider_height+2))+(slider_height/2),x_slider+slider_width+(10*slider_space),224-(line*(slider_height+2))+(slider_height/2));
| |
| − | for(int x=0;x<11;++x)
| |
| − | {
| |
| − | LEGO_Display.drawLine(x_slider+(slider_width/2)+(x*slider_space),224-(line*(slider_height+2)),x_slider+(slider_width/2)+(x*slider_space),224-(line*(slider_height+2))+(slider_height));
| |
| − | }
| |
| − | }
| |
| − |
| |
| − | // Display Slider Value on Screen
| |
| − | void DrawSliderValue(int line, int value)
| |
| − | {
| |
| − | if (line < 6)
| |
| − | LEGO_Display.setColor(255, 0, 0);
| |
| − | else
| |
| − | LEGO_Display.setColor(0, 255, 0);
| |
| − | if (value == 0)
| |
| − | LEGO_Display.setColor(0,0,0);
| |
| − | LEGO_Display.fillRoundRect(x_slider+(value*slider_space), 224-(line*(slider_height+2)), x_slider+slider_width+(value*slider_space), 224-(line*(slider_height+2)) + slider_height);
| |
| − | LEGO_Display.setColor(0, 0, 0);
| |
| − | LEGO_Display.drawRoundRect (x_slider+(value*slider_space), 224-(line*(slider_height+2)), x_slider+slider_width+(value*slider_space), 224-(line*(slider_height+2)) + slider_height);
| |
| − | if (value == 0)
| |
| − | {
| |
| − | LEGO_Display.setColor(255,255,255);
| |
| − | LEGO_Display.drawRoundRect (x_slider+(value*slider_space)+1, 224-(line*(slider_height+2))+1, x_slider+slider_width+(value*slider_space)-1, 224-(line*(slider_height+2)) + slider_height-1);
| |
| − | }
| |
| − | }
| |
| − |
| |
| − | // Remove Slider value from Screen
| |
| − | void EraseSliderValue(int line, int value)
| |
| − | {
| |
| − | LEGO_Display.setColor(0, 255, 255);
| |
| − | LEGO_Display.fillRoundRect(x_slider+(value*slider_space), 224-(line*(slider_height+2)), x_slider+slider_width+(value*slider_space), 224-(line*(slider_height+2)) + slider_height);
| |
| − | LEGO_Display.setColor(0,0,0);
| |
| − | LEGO_Display.drawLine (x_slider+(value*slider_space), 224-(line*(slider_height+2))+(slider_height/2), x_slider+slider_width+(value*slider_space), 224-(line*(slider_height+2))+(slider_height/2));
| |
| − | LEGO_Display.drawLine(x_slider+(slider_width/2)+(value*slider_space),224-(line*(slider_height+2)),x_slider+(slider_width/2)+(value*slider_space),224-(line*(slider_height+2))+(slider_height));
| |
| − | }
| |
| − |
| |
| − | // Draw Indicator Dots on Screen
| |
| − | void Indicators()
| |
| − | {
| |
| − | for(int x=0; x < 8; ++x)
| |
| − | {
| |
| − | DrawIndicatorValue(x,0);
| |
| − | }
| |
| − | }
| |
| − |
| |
| − | // Display Input and Output Status on Screen
| |
| − | void DrawIndicatorValue(int line, int value)
| |
| − | {
| |
| − | LEGO_Display.setColor(50,50,50);
| |
| − |
| |
| − | if (line < 6)
| |
| − | {
| |
| − | if (value != 0)
| |
| − | LEGO_Display.setColor(255,0,0);
| |
| − | }
| |
| − | else
| |
| − | {
| |
| − | if (value > 511)
| |
| − | LEGO_Display.setColor(0,255,0);
| |
| − | Serial.println(value);
| |
| − | }
| |
| − |
| |
| − | LEGO_Display.fillRoundRect(x_indicator-(line*indicator_space), y_indicator, x_indicator-indicator_width-(line*indicator_space), y_indicator + indicator_height);
| |
| − | LEGO_Display.setColor(0,0,0);
| |
| − | LEGO_Display.drawRoundRect(x_indicator-(line*indicator_space), y_indicator, x_indicator-indicator_width-(line*indicator_space), y_indicator + indicator_height);
| |
| − | }
| |
| − |
| |
| − | // Draw All Input Display on Screen
| |
| − | void Outputs()
| |
| − | {
| |
| − | for(int x=0;x<2;++x)
| |
| − | {
| |
| − | DrawOutput(x);
| |
| − | DrawOutputValue(x,LOW);
| |
| − | }
| |
| − | }
| |
| − |
| |
| − | // Draw each Input Display on Screen
| |
| − | void DrawOutput(int line)
| |
| − | {
| |
| − | String label=" Output ";
| |
| − | label.concat(char(48-line+7));
| |
| − | label.concat(" ");
| |
| − | LEGO_Display.setColor(255,255,255);
| |
| − | LEGO_Display.setBackColor(0,0,0);
| |
| − | LEGO_Display.print(label, LEFT,y_output+(line*(output_height+2)));
| |
| − | LEGO_Display.print(" ", RIGHT, y_output+(line*(output_height+2)));
| |
| − | LEGO_Display.setColor(0,0,0);
| |
| − |
| |
| − | LEGO_Display.drawRoundRect(x_output, y_output+(line*(output_height+2)), x_output+output_width, y_output+(line*(output_height+2)) + output_height);
| |
| − |
| |
| − | }
| |
| − |
| |
| − | // Draw Input Display based on Value to Screen
| |
| − | void DrawOutputValue(int line, int value)
| |
| − | {
| |
| − | if (line == 0)
| |
| − | line = 1;
| |
| − | else
| |
| − | line = 0;
| |
| − |
| |
| − | if (value > 511)
| |
| − | {
| |
| − | LEGO_Display.setColor(0,255,0);
| |
| − | LEGO_Display.fillRoundRect(x_output, y_output+(line*(output_height+2)), x_output+output_width, y_output+(line*(output_height+2)) + output_height);
| |
| − | }
| |
| − | else
| |
| − | {
| |
| − | LEGO_Display.setColor(50,50,50);
| |
| − | LEGO_Display.fillRoundRect(x_output, y_output+(line*(output_height+2)), x_output+output_width, y_output+(line*(output_height+2)) + output_height);
| |
| − | }
| |
| − | LEGO_Display.setColor(0,0,0);
| |
| − | LEGO_Display.drawRoundRect(x_output, y_output+(line*(output_height+2)), x_output+output_width, y_output+(line*(output_height+2)) + output_height);
| |
| − |
| |
| − | }
| |
| − | ''
| |
Backstory
A number of years ago, a visitor to the LVL1 Hackerspace brought in a box of old Lego items that their father had in storage. The hope was that they would be an interesting project to build something and then use it to demonstrate engineering to children at a science center. The central element was an Interface-A (70455) control unit. The Lego collection also included the Apple II interface card. A working Apple II was not available, so someone suggested driving the "brick" with an arduino.
First Step
Opening the "brick"
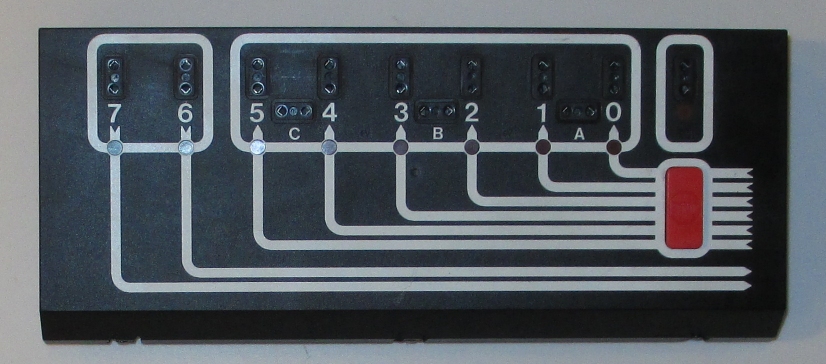
The first step was to open up the brick. This was done relatively easy by cutting a number of tabs along a seam.
Now, cutting the brick open was not really necessary since a number of web sites already document this piece of technology. The pin-outs and voltage specs can be found through a series of simple Google searches. Below is a site used for reference.
LEGO - LEGO's first programmable product
From this link one can navigate to a number of others sites with information about this product.
Among them is this page with pin-outs.
LEGO® TECHNIC 1093
The information was available and all that was required was a shield and some programming time to get an arduino to drive the brick.
Two Years Later - Some Follow Up
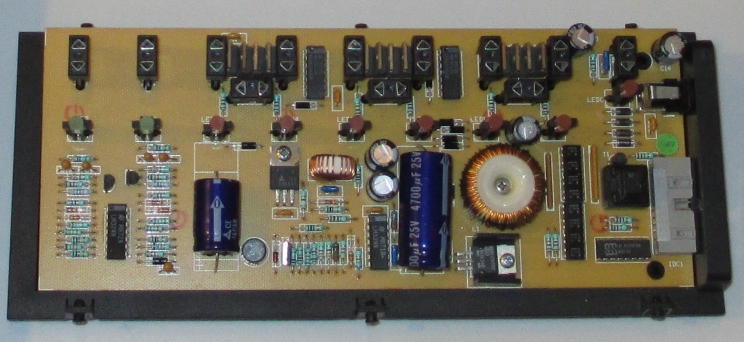
The project simply was forgotten until August 2015. The Director of Legal Evil for LVL1 discovered a LVL1 photo with the brick and decided to close the loop. Based upon the pin-outs and research, he fashioned an arduino UNO shield from a basic prototyping shield.
The shield simply wired arduino pins directly to the pins from the brick (via ribbon cable).
The Brick Output Ports (0-5) were wired to PWM pins. The brick supports PWM signals as a way of regulating voltage to its ports.
Wiring
| Arduino
|
Brick
|
Port Id
|
| 3
|
6
|
0
|
| 5
|
8
|
1
|
| 6
|
10
|
2
|
| 9
|
12
|
3
|
| 10
|
14
|
4
|
| 11
|
16
|
5
|
| A0
|
18
|
6
|
| A1
|
20
|
7
|
The Brick Input ports were wired to analog pins although testing to see if variable voltages would be sent from brick was not tested.
With the shield, an arduino could drive the brick. Now it was only a matter of writing arduino code.
Code becomes a Library
Code for the arduino would need to turn pins on and off as well as read the analog pins for input. A few #define, analogWrite and analogRead statements would be easy.
#define PORT0_PIN 3
#define PORT1_PIN 5
#define PORT2_PIN 6
#define PORT3_PIN 9
#define PORT4_PIN 10
#define PORT5_PIN 11
#define PORT6_ANALOGPIN 0
#define PORT7_ANALOGPIN 1
But once you write a few #define statements, you feel compelled to write a library. This library doesn't necessarily make things simpler but it can make a novices program requirements less pin detailed.
A library was created. During its creation the usual serial monitor statements were used to debug the system. But instead of stripping it out in the final version, an idea hatched. Instead of waiting for someone to write a program to drive the brick, why not allow it to accept terminal commands from the serial monitor or any other serial device. With this in mind, a serial input scheme was incorporated into the library as a command parser. The library link is below.
Control via Adruino Serial Monitor
#include "LegoTechnic.h"

String ByYourCommand;

LegoTechnic brick;

void setup()
{
  // put your setup code here, to run once:
  Serial.begin(9600);
  brick.Port_Initialize();
}

void loop()
{
  int Valid = HIGH;

  while (Valid == HIGH)
  {
    // put your main code here, to run repeatedly:
    while (Serial.available() == 0)
    {
    }

    ByYourCommand = Serial.readString();
    brick.Parse_Command(ByYourCommand);
  }

}
Instant Brick Driving Desired
With the library written and available, everything was complete. Except that writing a program takes time, terminal commands take syntax and people are sometimes impatient. To deal with these issues, a decision was made to make an interactive brick driver program using the library.
The parts needed:
Parts
|
|
|
|
|
|
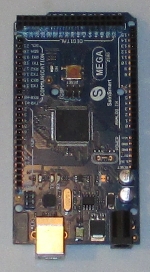
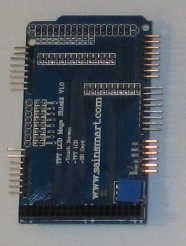
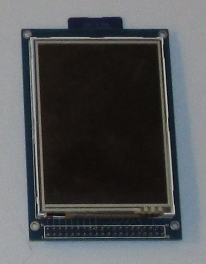
Arduino 2560 Mega
|
TFT LCD to 2560 Mega Shield
|
3.2" TFT LCD with Touch Screen and SD Card reader
|
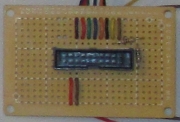
Connector to brick with two 10K pull-down resistors
|
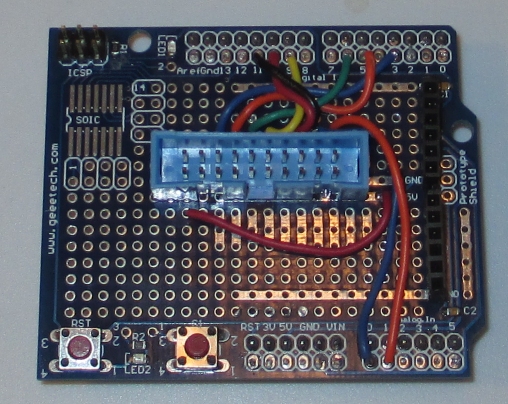
Wiring
|
|
Sainsmart Shield
|
|
|
| Arduino
|
LCD
|
Touch Screen
|
SD Card
|
Brick
|
Port Id
|
| 2
|
|
X
|
|
|
|
| 3
|
|
X
|
|
|
|
| 4
|
|
X
|
|
|
|
| 5
|
|
X
|
|
|
|
| 6
|
|
X
|
|
|
|
| 8
|
|
|
|
6
|
0
|
| 9
|
|
|
|
8
|
1
|
| 10
|
|
|
|
10
|
2
|
| 11
|
|
|
|
12
|
3
|
| 12
|
|
|
|
14
|
4
|
| 13
|
|
|
|
16
|
5
|
| A0
|
|
|
|
18
|
6
|
| A1
|
|
|
|
20
|
7
|
| 22
|
X
|
|
|
|
|
| 23
|
X
|
|
|
|
|
| 24
|
X
|
|
|
|
|
| 25
|
X
|
|
|
|
|
| 26
|
X
|
|
|
|
|
| 27
|
X
|
|
|
|
|
| 28
|
X
|
|
|
|
|
| 29
|
X
|
|
|
|
|
| 30
|
X
|
|
|
|
|
| 31
|
X
|
|
|
|
|
| 32
|
X
|
|
|
|
|
| 33
|
X
|
|
|
|
|
| 34
|
X
|
|
|
|
|
| 35
|
X
|
|
|
|
|
| 36
|
X
|
|
|
|
|
| 37
|
X
|
|
|
|
|
| 38
|
X
|
|
|
|
|
| 39
|
X
|
|
|
|
|
| 40
|
X
|
|
|
|
|
| 41
|
X
|
|
|
|
|
| 50
|
|
|
X
|
|
|
| 51
|
|
|
X
|
|
|
| 52
|
|
|
X
|
|
|
| 53
|
|
|
X
|
|
|


