Difference between revisions of "5th Inning"
Notyou007a (talk | contribs) |
|||
| (10 intermediate revisions by one other user not shown) | |||
| Line 1: | Line 1: | ||
| + | __NOTOC__ | ||
==Introduction== | ==Introduction== | ||
'''Pushbutton Switches''' | '''Pushbutton Switches''' | ||
| Line 20: | Line 21: | ||
==Schematic== | ==Schematic== | ||
| − | [[File:Lvl1-Inning5 schem.jpg]] | + | [[File:Lvl1-Inning5 schem.jpg|500px]] |
==Fritzing== | ==Fritzing== | ||
| − | [[File:Lvl1-Inning5 bb.jpg]] | + | [[File:Lvl1-Inning5 bb.jpg|500px]] |
==Code== | ==Code== | ||
| − | Cut and paste into your Arduino code environment. This code will light the LED connected to pin 13 when the button is pushed. If you removed the led from Inning 2, do not worry, pin 13 has a soldered on LED on most Arduinos and clones. | + | Cut and paste into your Arduino code environment. This code will light the LED connected to pin 13 (the one on your Arduino) when the button is pushed. If you removed the led from Inning 2, do not worry, pin 13 has a soldered on LED on most Arduinos and clones. Pin 2 was used, so the switch does not have to be removed for future experiments. |
| + | |||
| + | NOTE: The circuit and code on the Arduino site really does not work very well. In the case of just turning on and off a led, it works ok, but having a floating low when the switch is pushed makes the circuit unreliable. To fix (Thanks Tim Knowles) we have the circuit default to low, then we pull the line high when the switch is pushed by engaging the internal resistor using this line of code... | ||
| + | <pre> | ||
| + | digitalWrite(inPin,HIGH); //engages internal pullup resistor | ||
| + | </pre> | ||
| + | really it works! Try it! | ||
<pre> | <pre> | ||
| Line 34: | Line 41: | ||
* | * | ||
* turns on and off a light emitting diode(LED) connected to digital | * turns on and off a light emitting diode(LED) connected to digital | ||
| − | * pin 13, when pressing a pushbutton attached to pin | + | * pin 13, when pressing a pushbutton attached to pin 2. It illustrates the |
* concept of Active-Low, which consists in connecting buttons using a | * concept of Active-Low, which consists in connecting buttons using a | ||
* 1K to 10K pull-up resistor. | * 1K to 10K pull-up resistor. | ||
| Line 45: | Line 52: | ||
int ledPin = 13; // choose the pin for the LED | int ledPin = 13; // choose the pin for the LED | ||
| − | int inPin = | + | int inPin = 2; // choose the input pin (for a pushbutton) |
int val = 0; // variable for reading the pin status | int val = 0; // variable for reading the pin status | ||
| Line 51: | Line 58: | ||
pinMode(ledPin, OUTPUT); // declare LED as output | pinMode(ledPin, OUTPUT); // declare LED as output | ||
pinMode(inPin, INPUT); // declare pushbutton as input | pinMode(inPin, INPUT); // declare pushbutton as input | ||
| + | digitalWrite(inPin,HIGH); //engages internal pullup resistor | ||
} | } | ||
| Line 61: | Line 69: | ||
} | } | ||
} | } | ||
| + | |||
| + | |||
| + | </pre> | ||
| + | |||
| + | Run this code instead if you have the LCD hooked up. It says whether the button is up or down on the neato display! | ||
| + | |||
| + | <pre> | ||
| + | //This switch code looks at the pushbutton pin (2) | ||
| + | //and resets the counter if it is pressed! | ||
| + | //bpw 5/11/10 | ||
| + | |||
| + | |||
| + | // include the library code: | ||
| + | #include <LiquidCrystal.h> | ||
| + | |||
| + | // initialize the library with the numbers of the interface pins | ||
| + | LiquidCrystal lcd(7, 8, 9, 10, 11, 12); | ||
| + | |||
| + | int inPin = 2; // choose the input pin (for a pushbutton) | ||
| + | int val = 0; // variable for reading the pin status | ||
| + | |||
| + | |||
| + | |||
| + | void setup() { | ||
| + | // set up the LCD's number of rows and columns: | ||
| + | lcd.begin(16, 2); | ||
| + | // Print a message to the LCD. | ||
| + | lcd.print("hello, world!"); | ||
| + | |||
| + | pinMode(inPin, INPUT); // declare pushbutton as input | ||
| + | digitalWrite(inPin,HIGH); //engages internal pullup resistor | ||
| + | } | ||
| + | |||
| + | void loop() { | ||
| + | // set the cursor to column 0, line 1 | ||
| + | // (note: line 1 is the second row, since counting begins with 0): | ||
| + | lcd.setCursor(0, 1); | ||
| + | // print the number of seconds since reset: | ||
| + | lcd.print(millis()/1000); | ||
| + | |||
| + | lcd.setCursor(8, 1); //col 8, row 1 | ||
| + | //code for button pressed! | ||
| + | val = digitalRead(inPin); // read input value | ||
| + | if (val == LOW) { // check if the input is HIGH (button released) | ||
| + | lcd.print("DOWN"); | ||
| + | } else { | ||
| + | lcd.print("UP "); | ||
| + | } | ||
| + | |||
| + | } | ||
| + | |||
| Line 68: | Line 127: | ||
==Resources== | ==Resources== | ||
| − | See | + | See http://www.arduino.cc/en/Tutorial/Pushbutton for more information on pushbutton switches. |
| + | |||
| + | Here is the link to the LCD Library http://arduino.cc/en/Reference/LiquidCrystal?from=Tutorial.LCDLibrary | ||
| + | |||
| + | [[Category:HOWTO]] | ||
Latest revision as of 00:49, 26 June 2015
Introduction
Pushbutton Switches Switches are probably the most common human to computer input. Fortunatly they are easy to do. This circuit uses a pull-up resistor and a pushbutton switch to light an LED.
Components Needed
- Freeduino or Arduino or clone
- USB cable for Freeduino
- Freeduino development software - download here!
- Solderless Breadboard
- Hookup wire 22gauge solid
- Pushbutton Switch
- Soldering Iron and Solder to solder wires to switch
- 1 kOhm resistor (Brown-Black-Red)
How to
- For our workshop, you will have to solder some hookup wire to one of your pushbutton switches. Just strip back a half an inch of wire or so, stick it through the hole on the switch lead and solder. You will have help. It is easy.
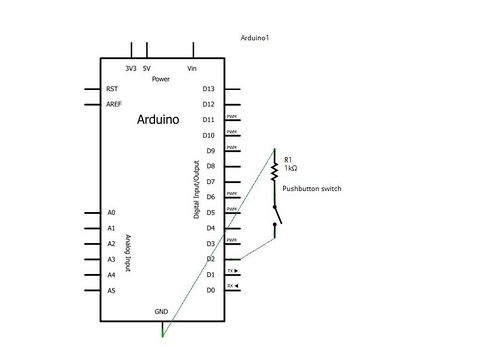
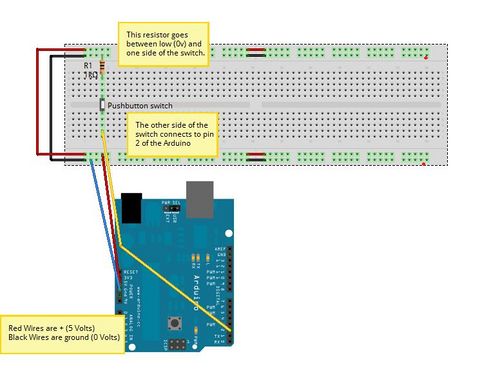
- Follow the fritzing diagram and hook up the circuit.
- Cut and paste your code and run!
Schematic
Fritzing
Code
Cut and paste into your Arduino code environment. This code will light the LED connected to pin 13 (the one on your Arduino) when the button is pushed. If you removed the led from Inning 2, do not worry, pin 13 has a soldered on LED on most Arduinos and clones. Pin 2 was used, so the switch does not have to be removed for future experiments.
NOTE: The circuit and code on the Arduino site really does not work very well. In the case of just turning on and off a led, it works ok, but having a floating low when the switch is pushed makes the circuit unreliable. To fix (Thanks Tim Knowles) we have the circuit default to low, then we pull the line high when the switch is pushed by engaging the internal resistor using this line of code...
digitalWrite(inPin,HIGH); //engages internal pullup resistor
really it works! Try it!
/* Basic Digital Read
 * ------------------
 *
 * turns on and off a light emitting diode(LED) connected to digital
 * pin 13, when pressing a pushbutton attached to pin 2. It illustrates the
 * concept of Active-Low, which consists in connecting buttons using a
 * 1K to 10K pull-up resistor.
 *
 * Created 1 December 2005
 * copyleft 2005 DojoDave <http://www.0j0.org>
 * http://arduino.berlios.de
 *
 */

int ledPin = 13; // choose the pin for the LED
int inPin = 2;   // choose the input pin (for a pushbutton)
int val = 0;     // variable for reading the pin status

void setup() {
  pinMode(ledPin, OUTPUT);  // declare LED as output
  pinMode(inPin, INPUT);    // declare pushbutton as input
  digitalWrite(inPin,HIGH);  //engages internal pullup resistor
}

void loop(){
  val = digitalRead(inPin);  // read input value
  if (val == HIGH) {         // check if the input is HIGH (button released)
    digitalWrite(ledPin, LOW);  // turn LED OFF
  } else {
    digitalWrite(ledPin, HIGH);  // turn LED ON
  }
}
Run this code instead if you have the LCD hooked up. It says whether the button is up or down on the neato display!
//This switch code looks at the pushbutton pin (2)
//and resets the counter if it is pressed!
//bpw 5/11/10


// include the library code:
#include <LiquidCrystal.h>

// initialize the library with the numbers of the interface pins
LiquidCrystal lcd(7, 8, 9, 10, 11, 12);

int inPin = 2;   // choose the input pin (for a pushbutton)
int val = 0;     // variable for reading the pin status


void setup() {
  // set up the LCD's number of rows and columns:
  lcd.begin(16, 2);
  // Print a message to the LCD.
  lcd.print("hello, world!");

  pinMode(inPin, INPUT);    // declare pushbutton as input
digitalWrite(inPin,HIGH);  //engages internal pullup resistor
}

void loop() {
  // set the cursor to column 0, line 1
  // (note: line 1 is the second row, since counting begins with 0):
  lcd.setCursor(0, 1);
  // print the number of seconds since reset:
  lcd.print(millis()/1000);

  lcd.setCursor(8, 1);  //col 8, row 1
  //code for button pressed!
  val = digitalRead(inPin);  // read input value
  if (val == LOW) {         // check if the input is HIGH (button released)
    lcd.print("DOWN");
  } else {
    lcd.print("UP  ");
  }

}
Troubleshooting
Resources
See http://www.arduino.cc/en/Tutorial/Pushbutton for more information on pushbutton switches.
Here is the link to the LCD Library http://arduino.cc/en/Reference/LiquidCrystal?from=Tutorial.LCDLibrary

